This article is compatible with the latest version of Silverlight.
As its name says the Border is a Silverlight control that acts as a border. You can put ONE other control in it and it will act as border of the child control.
See also:
Silverlight Layout controls
Canvas Article
StackPanel Article
Grid Article
Overview
The following examples demonstrate Border’s key properties:
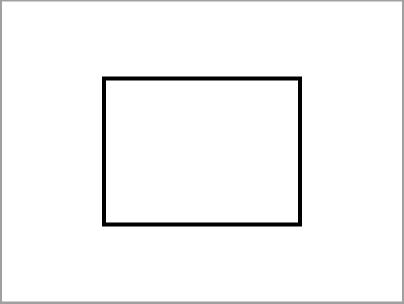
We want to have the following frame:
Here is the XAML code:
<UserControl x:Class="Border2.Page"
xmlns="http://schemas.microsoft.com/winfx/2006/xaml/presentation"
xmlns:x="http://schemas.microsoft.com/winfx/2006/xaml"
Width="400" Height="300">
<Grid x:Name="LayoutRoot" Background="White">
<Border x:Name="brdTest" BorderBrush="Black" BorderThickness="4" Width="200" Height="150">
</Border>
</Grid>
</UserControl>
One of the important properties is the BorderThickness. It shows how wide the border is. If the thickness is a positive value, the border is drawn inside the object's bounding box. If the thickness is negative, the border is drawn outside the object's bounding box. In our case having in mind that the thickness is 4 pixels, the width is 200 pixels and the height is 150 pixels we have a space with dimensions 192 x 142 pixels in the Border control.
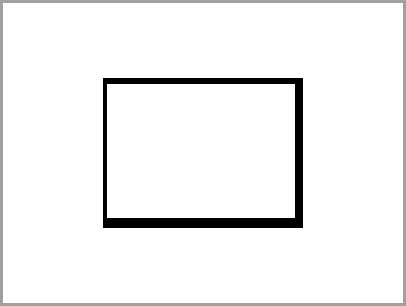
You can also set different thickness for every Border side:
XAML:
<Border x:Name="brdTest" BorderBrush="Black" BorderThickness="4, 6, 8 ,10" Width="200" Height="150">
</Border>
One interesting property is the BorderBrush. You can set it as attribute using one of the Colors enumeration but you can also use a Brush object for it. The following example demonstrates its use:
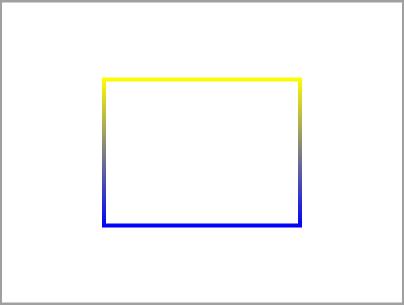
XAML:
<Border x:Name="brdTest" BorderThickness="4" Width="200" Height="150">
<Border.BorderBrush>
<LinearGradientBrush x:Name="borderLinearGradientBrush" MappingMode="RelativeToBoundingBox" StartPoint="0.5,0" EndPoint="0.5,1">
<LinearGradientBrush.GradientStops>
<GradientStop Color="Yellow" Offset="0" />
<GradientStop Color="Blue" Offset="1" />
</LinearGradientBrush.GradientStops>
</LinearGradientBrush>
</Border.BorderBrush>
</Border>
You can use different brushes. Just use your imagination.
The Background property can be used in the same manner as the BorderBrush property. The following example will demonstrates it:
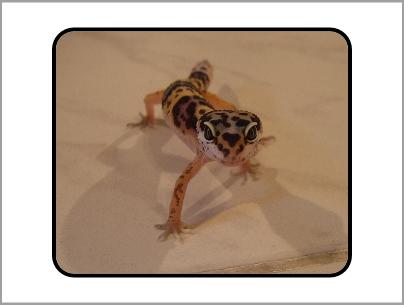
XAML:
<Border CornerRadius="20" x:Name="brdTest" BorderBrush="Black" BorderThickness="4" Width="300" Height="250">
<Border.Background>
<ImageBrush x:Name="backgroundImageBrush" Stretch="UniformToFill">
<ImageBrush.ImageSource>
<BitmapImage x:Name="bmpBackground" UriSource="http://terraristic.net/photos/ Eublepharis_macularius/Eublepharis_macularius_4.jpg">
</BitmapImage>
</ImageBrush.ImageSource>
</ImageBrush>
</Border.Background>
</Border>
Did you notice that the corners of the Border are rounded? We used the CornerRadius property for this effect.
Using the Child property you can programatically set the child element of the border:
public Page()
{
InitializeComponent();
Rectangle rectBlue = new Rectangle();
rectBlue.Width = 1000;
rectBlue.Height = 1000;
SolidColorBrush scBrush = new SolidColorBrush( Colors.Blue );
rectBlue.Fill = scBrush;
this.brdTest.Child = rectBlue;
}
The Padding property determines the distance between the Border and its child element:
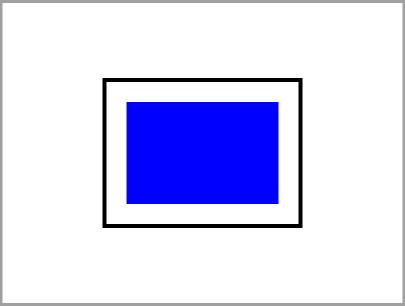
XAML:
<Border Padding="20" BorderBrush="Black" x:Name="brdTest" BorderThickness="4" Width="200" Height="150">
<Rectangle x:Name="rectBlue" Fill="Blue" Width="300" Height="200" HorizontalAlignment="Center" VerticalAlignment="Center"></Rectangle>
</Border>
Issues
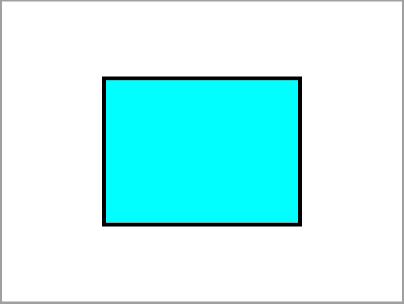
For example if we have a Rectangle as a child element in the Border that is much bigger:
<Border BorderBrush="Black" x:Name="brdTest" BorderThickness="4" Width="200" Height="150">
<Rectangle x:Name="rectBlue" Fill="Cyan" Width="1000" Height="1000" HorizontalAlignment="Center" VerticalAlignment="Center"></Rectangle>
</Border>
Everything is OK, the Rectangle fills the Border and is cut so only the part that is inside the border is visible:
But if we put again the CornerRadius="20" it looks awful:
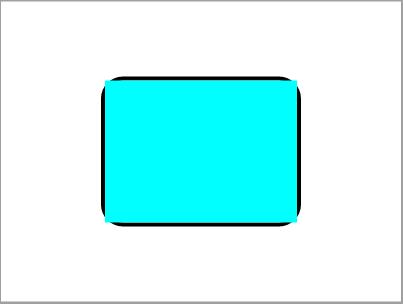
I remember this issue since the Silverlight 2 Beta 1 version and was not fixed in the final release.
Conclusion
This article covers the key features of the Border control. It targets the developer who has just started with the Silverlight controls. Any comments are welcome.
Reference
http://msdn2.microsoft.com/en-us/library/system.windows.controls.border(VS.95).aspx