1: <TextBlock x:Uid="title" Text="???" />
Since the .NET Framework born, localization has always been something that developer manages using a big set of tools that make his life easier. ASP.NET, Windows Forms, WPF and Silverlight have all a way to make applications available in multiple countries, handling not only the language issues in term of "strings" but also in term of formats, text direction and other language specific issues.
Saying the truth, we know that every platform comes with a different flavour of globalization tool. From the first ASP.NET release to the most recent in Silverlight, every platform expressed a subtle different way (in its exterior aspect) of handling languages, also if all of them were based on a common set of infrastructural objects. Microsoft-Style applications do not differ in this, but they also introduces a completely new way of handling this matter, changing to a model that differs from the past, almost as it is effective in its way of working.
What's new in localization?
Do you have clear in mind how localization works, prior of Windows Store apps? To make it simple, the model of localization in the .NET framework is based on the so-called hub-and-spoke architecture. Behind this term - that someone may feel mostly related to bikes instead of information technology - it stands the concept of delegation and distribution. Applying this concept to localization, means that an application relies always on a default language that is embedded in the main assembly and on a number of satellite assemblies that contain other languages. So, when the ResourceManager searches for a resource, it has to deal with a number of assemblies before to find the correct translation.
In Windows Store apps instead, satellite assemblies do not exist anymore. Resources are now packaged into a single file, called "Package Resource Index" (PRI) and there is also a completely new class to access them; the ResourceLoader. From the developer point of view, this new architecture means to use "resw" files instead of "resx" files. At compile time, these files are compiled into a single file by the MakePRI utility (Visual Studio does all the work for you) and the resulting file is added to the application's package.
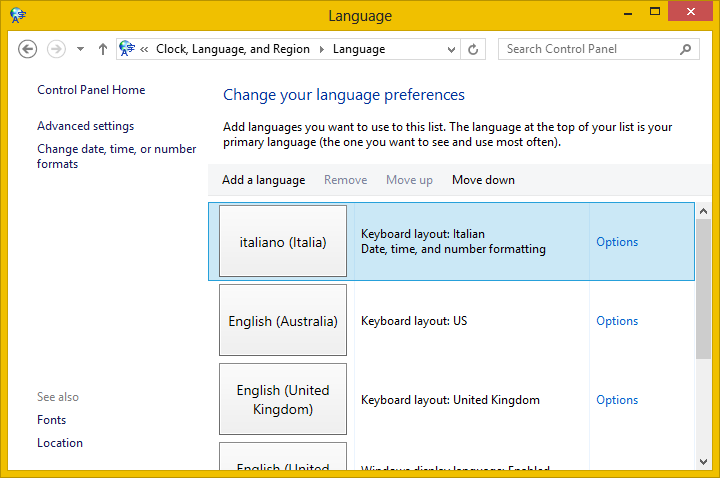
Another subtle difference, is about how cultures are handled. In a desktop application you can always change at runtime the culture, setting the CultureInfo.CurrentCulture property. This was to handle globalized applications that might show a culture different from the one that the operating system is currently using. This is not available anymore in "Windows Store apps" where the culture specified by the operating system is strictly used by the application and it can only change when the user changes the regional settings. This is the main source of confusion the first time you deal with resources, because it is not immediately clear how to change the culture. The correct way is to use the control panel applet under Control Panel > Clock, Language, and Region > Language.

In the screenshot above, the language applet shows a set of languages, but only the first in the list is used by the "Windows Store apps". No matter the language you selected in Region settings and used by the desktop, or the language you setup for the keyboard layout, the Windows Store app always relies on the first element in this list and you can easily test localization changing its order.
Setup your project
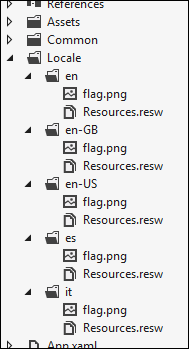
 Using localized resources imply an easy setup for your project. Given that all the packaging work will be done at compile time by Visual Studio, we need to put things in the right position to correctly retrieve the right resource, based on the language. My way of life in this matter is to create a "Locale" folder at the root level in the project. Inside this folder (you can change its name if you like), I create a series of folders, one for each language my application supports. Please refer to the figure on the left side.
Each folder in this structure will contain a "resw" file - I'm use to call them Resources.resw but nothing prevents you to name it differently - and, as we will see in the following, the images that need to be localized.
You have to notice, in the figure, that I created some folders with the neutral culture name (en, es, it) and some other folders with the country-specific name. This let you specify different flavours for each language, letting the system to fallback to the neutral culture, when a specific country is not supported. In this sample the United Kingdom and United States are supported and they'll use the resources in the respective folders. Australian users (with the culture en-AU) will fall back to the neutral culture (en) because the specific-country culture is not supported.
As I said few lines ago, images are also localizable. With satellite assemblies, images were embedded into the resx file but now are part of the directory structure making it so easy to work with them. Obviously, localized images also supports different pixel densities using the known pattern that requires the "scale-*" pattern in the name.
The last activity to accomplish is to set the default language. This is the language that will be used as final fallback, if the requested culture is not available. In my project structure it does not exist a German language so I specified that in this case the en culture will be used. This helps to give always an usable interface to the user. To specify the default language you can open the manifest and set this property to one of the languages you support.
Globalization recipes
Now that the localization structure is ready, it's time to discover how to use resources stored in files. The work the team did in making your life easy is really impressive. To read a resource programmatically, you can easily use the ResourceLoader class. This class, in its most simple use let you specify the name of the string to read and returns its value:
1: ResourceLoader rl = new ResourceLoader();
2: string theResource = rl.GetString("TheResource");
Creating an instance without parameters imply you read from a single resw file. But if you need to better organize resources you can create a number of files and you can specify the "ResourceMap" that is the name of the file without the extension. As an example if you created a "Messages.resw" file you can read from this file in this way:
1: ResourceLoader rl = new ResourceLoader("Messages");
2: string theResource = rl.GetString("TheResource");
Be aware that the "Resources.resw" file is taken as default, so if you don't specify a name the choice falls to it, also if the project contains more resw. The reason to have a default file is to handle another scenario. Definitely, fill the user interface by code is not the most easy way. It may be useful sometimes, for message dialogs, for exceptions an other similar cases, but the user interface is made of a number of labels, and other elements. To fill these elements you need a more effective way to avoid wasting lot of time.
A new extension attribute has been introduced for this scope. It is the x:Uid that let you give a unique name for the needs of the localization. Here is and example:
1: <TextBlock x:Uid="title" Text="default" />
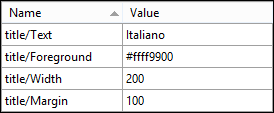
Given that an element named with this attribute can have many properties you have to use a special notation into the Resources.resw file. The notation wants the name of the element and the name of the property separated by a slash. An example in the figure on the side.
Interesting to say, with this technique you can localize also properties that are not strings. As an example you can specify colors, dimensions and so on. This may sound silly, but there are some cases where the size of an element are not sufficient to contain a string in a given language. As an example german is a language that often has very long words because they are composed. So in this case you are also able to specify a different size that only apply to German.
Finally images. After you created the images and embedded them into the directory structure, you can easily use the <Image> tag in XAML to specify the path to the image, writing it simply as if the culture folder does not exist.
1: <Image Source="locale/flag.png" Width="200" Stretch="Uniform" />
The runtime automatically detects that there are a number of versions of the image, that differs by the culture and compiles the exact path. Also if the image is provided in different scales, the trick works. All these paths are valid:
1: locale/en/flag.scale-100.png
2: locale/en/flag.scale-140.png
3: locale/en/flag.scale-180.png
4:
5: locale/en/scale-100/flag.png
6: locale/en/scale-140/flag.png
7: locale/en/scale-180/flag.png
Certification & Globalization
Localization is not only a matter of development effort, but also is something that may cause failures in application certification. The marketplace team checks accurately for the language specifications. In my experience I failed a certification because I set english as default language in an application that was targeted to the italian market. The lesson is to always double check the supported languages and ensure to support correct languages based on the markets where you want to sell your product.