Note: This article is submitted by Gozzo Smith for Silverlight: Write and Win contest.Thanks a lot, Gozzo! Hello All, Please drop a comment if you like it.
This article is compatible with the latest version of Silverlight.
1. Introduction
Animations allow you to create truly dynamic user interface. They are a core part of the Silverlight/WPF model. The most natural way to create them is to create them declaratively (in the XAML), configure them, and put them into action without writing a single line of C# code or using timers. At first glance, I thought that the property-focused nature of Silverlight animations seems terrible limiting. However, in the process of work I found out that it’s surprisingly capable. In fact, you can create a wide range of animated effects using common properties that every element supports.
Although Silverlight provides powerful animation features, in some cases, it is impossible to use the standard approach, and you do need to create your own custom animation. For example if you want to create an animation which is based on physics laws or collision detection, where each step in the animation requires objects to be recalculated based on the last set of object values, then you have to create your own animation.
The target of the article is to show you how you can create animations which completely bypass the Silverlight animation system.
Download Source
2. Custom animations in Silverlight
There are two approaches that can be used to extend the Silverlight animation system:
- The first one is to create your own timer – based animation using the DispatcherTimer. I will say a few words about it, but I will not go into details.
- The second way is more interesting. You can create a custom animation using per-frame callback to generate per - frame animations. The second part of the article is focused on the creation of a practical example, which is based on this kind of animation.
- Although it is not supported in Silverlight, but only in WPF, there is one more way to create a custom animation. I think I should mention it here. You can create a custom animation class by inheriting from AnimationTimeline or <Type>AnimationBase classes.
2.1. Timer based animations
The classical approach from WindowsForms to implement an animation is to set up a timer and a callback function that is periodically called back based on the interval of the timer. In the body of that function you can periodically update the target property until it reaches the final value and then to stop the timer.
There are two types of timers in Silverlight. The first one is the Timer class from the System.Threading namespace and the second one is the DispatcherTimer from the System.Windows.Threading namespace. The biggest and most important difference between the DispatcherTimer and the Timer is that the handlers for DispatcherTimer are invoked on the UI thread. This means that your UI elements can be manipulated inside the handler without worrying about threading. But if you use the Timer, then you must separate your update logic into a different function and use the Dispatcher to invoke it on the UI thread.
For example: if you use the DispatcherTimer then you can put your animation logic directly in the callback:
DispatcherTimer dispatcherTimer = new DispatcherTimer();
dispatcherTimer.Tick += new EventHandler( dispatcherTimer_Tick );
dispatcherTimer.Interval = TimeSpan.FromSeconds( 1 );
dispatcherTimer.Start();
private void dispatcherTimer_Tick( object sender, EventArgs e )
{
// Update your user interface elements directly
}
But if you use the Timer class then you should have the following code structure:
Timer timer = new Timer( new TimerCallback( this.Callback ), null, 0, 1000 );
void Callback( object state )
{
this.Dispatcher.BeginInvoke( new Action( this.UpdateUIElements ) );
}
void UpdateUIElements()
{
// Update your user interface elements here
}
Or you can use the other overload of the BeginInvoke method which allows you to pass parameters in the function responsible for the user interface update.
2.2. Per - frame animation
Instead of implementing custom timer-based animation, you could perform custom frame-by-frame animation by attaching an event handler to the static Rendering event on System.Windows.Media.CompositionTarget. Rather than being raised at a customizable interval, this event is raised post-layout and pre-render once per frame. In the event handler, you could perform whatever calculations you want, and set the properties of the target objects you want to animate with the calculated values. In other words, you need to manage yourself all the work associated with the animation. Using the frame – based Rendering event is not only preferred over a timer – based approach, but it’s the only possible solution when you have hundreds of objects that require high – fidelity animations. The Rendering event generally gives the best performance but there are tradeoffs. As long as any event handler is attached to Rendering, Silverlight continuously renders frames. Therefore, Rendering is best for short-lived animations.
3. Creating the pendulum demo
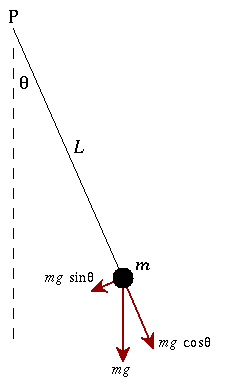
In the next paragraph I will explain how a real physical problem can be resolved with a frame–by–frame animation. I will show you how to create an animated pendulum. The simplest definition for pendulum is an object that is attached to a pivot point so that it can swing freely. But to acquire a better idea about the nature of the problem lets dive deeper into the physic and math.
A pendulum consists of a mass m (which is also called bob) on the end of a string (with length L) of negligible mass and fixed at a pivot point P. When it is displaced to an initial angle Theta and released, the pendulum will swing back and forth with periodic motion. If we consider the damping coefficient and apply the Newton’s second law for rotation systems, then we got the motion equation for the pendulum.
Where

The next part is the most difficult – we should resolve the differential equation. I will use the Runge - Kutta methods. They are an important family of implicit and explicit iterative methods for the approximation of solutions of ordinary differential equations. One member of the family of Runge – Kutta methods is so commonly used that it is often referred to as “RK4” or simply “the Runge – Kutta method”.
3.1. Creating the user interface
By using the Microsoft Expression Blend tool I will create the user interface. It contains TextBoxes for the input information. The user may specify the mass of the ball, the length of the string, the initial angle and the damping factor. The gravity acceleration is constant and it is set to 9.81 m/s2. There are three buttons which allow you to start the animation, to stop it or to reset the input values. The coordinate system will display the dependence of the angle from the time. The coordinate system is compound from two lines - one for the x-axes and one for the y-axes. The curve that represents the dependence between the angle and the time is standard Polyline.
<Grid Margin="0,0,0,0" Grid.Row="1" x:Name="PendulumGrid" ShowGridLines="False">
<!-- The pendulum is declared here -->
<!-- Next create the coordinate system -->
<Line X1="5" Y1="20" X2="5" Y2="180" Grid.Row="1" Stroke="#FF000000" x:Name="AbcsissLince"/>
<Line X1="5" Y1="100" X2="590" Y2="100" Grid.Row="1" Stroke="#FF000000" x:Name="OrdinateLine"/>
<Polyline Grid.Row="1" x:Name="TimeCurve" Stroke="#FF3DC2FF"/>
<TextBlock Height="15" HorizontalAlignment="Left" Margin="8,8,0,0" VerticalAlignment="Top" Width="65"
Grid.Row="1" Text="Angle" TextWrapping="Wrap" x:Name="lblAngle"/>
<TextBlock Height="15" Margin="0,0,-17,67" x:Name="lblTime" VerticalAlignment="Bottom" Text="Time"
TextWrapping="Wrap" HorizontalAlignment="Right" Width="65" Grid.Row="1"/>
</Grid>
The pendulum is made of one ellipse (which represents the black pivot), one line (which connects the pivot with the ball) and a user control (which represents the bob). The user control just contains a simple image.
3.2. Creating the pendulum model
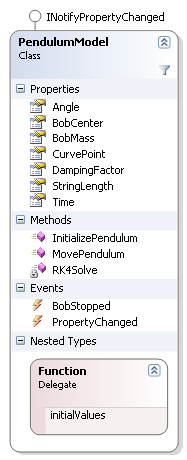
The whole business logic is separated from the user interface in a class named PendulumModel. The class diagram is shown on the next figure:
The model implements the INotifyPropertyChanged interface and exposes properties for all input information. The BobCenter property contains information about the new Bob center in each moment of the animation. Each new point that must be added to the polyline is stored in the CurvePoint property. The most important methods in the model are:
- InitializePendulum – set the model fields with some default values.
- MovePendulum – this method is called from the view during the frame – by – frame animation. The whole calculations are concentrated here. In fact this is the heart of the model.
- RK4Solve – helper method which solves the ordinary differential equation by Runge – Kutta method.
There are two custom events – one which is fired when the pendulum is in piece, and the other which is part of the implemented interface. When the BobStopped event is fired, then the view will detach from the CompositionTarget.Rendering event and the animation will stop completely.
The next code snippet shows the body of the MovePendulum function.
public void MovePendulum()
{
// 1. Solve the ODE
this.result = this.RK4Solve();
// 2. Calculate the new position of the Bob
this.BobCenter = new Point(
300 + 130 * Math.Sin( result[ 0 ] ),
20 + 130 * Math.Cos( result[ 0 ] ) );
// 3. Calculate the coordinates of the new point which must be added to the time curve.
this.CurvePoint = new Point( time * 10 + 5,
-( 180 * result[ 0 ] / Math.PI ) + 100 );
// 4. Increment the time with constant value each time when this method is executed
this.Time += PendulumModel.IncrementValue;
// 5. If the displacing angle is so small, then the animation should stop.
if ( this.Time > 0 && Math.Abs( result[ 0 ] ) < 0.01 && Math.Abs( result[ 1 ] ) < 0.001 )
this.OnBobStopped( EventArgs.Empty );
}
And the RK4Solve method.
private double[] RK4Solve()
{
Function[] functions = new Function[ 2 ] { this.GetSecondParameter, this.GetFirstParameter };
double[] k1 = new double[ 2 ];
double[] k2 = new double[ 2 ];
double[] k3 = new double[ 2 ];
double[] k4 = new double[ 2 ];
double[] x1 = new double[ 2 ];
double[] result = this.result;
for ( int i = 0; i < 2; i++ )
k1[ i ] = PendulumModel.IncrementValue * functions[ i ]( result );
for ( int i = 0; i < 2; i++ )
x1[ i ] = result[ i ] + k1[ i ] / 2;
for ( int i = 0; i < 2; i++ )
k2[ i ] = PendulumModel.IncrementValue * functions[ i ]( x1 );
for ( int i = 0; i < 2; i++ )
x1[ i ] = result[ i ] + k2[ i ] / 2;
for ( int i = 0; i < 2; i++ )
k3[ i ] = PendulumModel.IncrementValue * functions[ i ]( x1 );
for ( int i = 0; i < 2; i++ )
x1[ i ] = result[ i ] + k3[ i ];
for ( int i = 0; i < 2; i++ )
k4[ i ] = PendulumModel.IncrementValue * functions[ i ]( x1 );
for ( int i = 0; i < 2; i++ )
result[ i ] += ( k1[ i ] + 2 * k2[ i ] + 2 * k3[ i ] + k4[ i ] ) / 6;
return result;
}
The whole formulas can be seen in the world web.
3.3. Testing the application
In order to start the animation a few lines of codes must be added in the view.
public Page()
{
InitializeComponent();
pendulum = new PendulumModel();
this.DataContext = pendulum;
pendulum.InitializePendulum();
pendulum.BobStopped += new EventHandler( pendulum_BobStopped );
}
First I create a new instance of the model and set it as a DataContext for the current control. Second I initialize the values of the model. When the user presses the Start button I attach to the static CompositionTarget rendering event. And when the Stop button is pressed – respectively detached from the event. Inside the Animation event handler MovePendulum method of the model is called each time and after that the pendulum location is updated with the result point.
private void btnStart_Click( object sender, RoutedEventArgs e )
{
CompositionTarget.Rendering += new EventHandler( PendulumDemo );
}
// And the Event handler
private void PendulumDemo( object sender, EventArgs e )
{
this.pendulum.MovePendulum();
Bob.SetValue( Canvas.LeftProperty, ( double )this.pendulum.BobCenter.X - 20.5 );
Bob.SetValue( Canvas.TopProperty, ( double )this.pendulum.BobCenter.Y - 25.5 );
String.X2 = this.pendulum.BobCenter.X;
String.Y2 = this.pendulum.BobCenter.Y;
TimeCurve.Points.Add( this.pendulum.CurvePoint );
}
4. Conclusion
In that article I showed you how to create an animation in Silverlight, which completely bypass the standard system.
Few things must be remembered. When you need to create a complex physics animations or detecting collisions, then there is no other solution except to create a custom animation. In Silverlight there are two ways to do that. First you can use a timer and the second one is to use a frame–by–frame animation through the static CompositionTarget.Rendering event. It is preferable to use the second variant. But also the frame–by–frame animation is appropriate for short live animation.
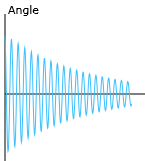
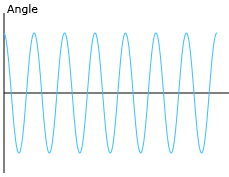
About the demo, few things must be mentioned for the user. If you want to accelerate the pendulum then you should make the String shorter. See the frequency of the time line when the String is equals to 0.1.
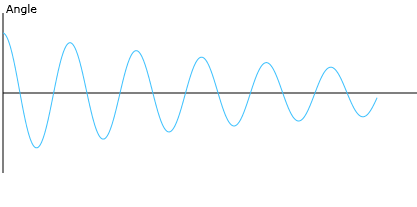
If you want to make the animation indefinite, then you should make the damping coefficient equals to zero or you should increase the mass of the bob. See the time line when the damping coefficient is zero.
If you want to decrease the speed then you should make the String length longer. If the String is equals to 10, then we have:
There are a lot more combinations but I will leave it for you to experiment. I hope the article was useful for you and if you have any further ideas or questions, please be my guest and share them with me.