1. Introduction
Silverlight 3 is already a fact and along with it a new version of Expression Blend has been released. One of the changes in the Expression Blend that makes me a deep impression is that the new Blend has been made more approachable for designers. Beside the behaviors, Photoshop and Illustrator importers, the new Blend 3 makes a huge step in the direction of making better user experience. This step is the SketchFlow. The SketchFlow is a new set of tools for Expression Blend to create sketches and prototypes of interactive content and applications. That gives Blend a new role in the design phases of the development process. It offers you informal, quick and cost effective way to sketch out your ideas for your application. The most important features of the SketchFlow are:
- Customers can test the concepts you are prototyping without installing any additional software.
- Customers may express their thoughts about the prototype in annotated comments which can be viewed directly on the design surface. In that way we can receive quick feedback from the customer. Once you are ready to demonstrate the prototype, you can receive immediate feedback via the SketchFlow player.
- The SketchFlow allows us to experiment with the flow of an application UI quickly and effectively. We can prototype the individual screens and how the application will transition from one state to another.
- Powerful Documentation – only with two mouse clicks you can create full and detailed documentation for your prototype (as I will do later in the post).
- “Sketchy” style controls – the standard UI controls have a nice look. They are good for a real application, and not good for a prototype. The reason: if you show a prototype which uses the standard control, people evaluating the prototype easily focus on the wrong things, it is just a human characteristic. That’s why the "Sketchy" style allows you to keep the client focus on the overall solution rather than keeping it on the detail early in the prototype stage.
So in this post I will show you the most important features of the SketchFlow and will guide you in the creation of a prototype for a real application. In order to be able to create sketches and prototypes you will need the new version of Microsoft Expression Blend 3. You can download it from the download section of the official Expression Blend site.
You can see the demo here.
Download demo project from here.
2. SketchFlow Map
As I mention in the introduction section the SketchFlow enables you to experiment with the flow of an application UI, the layout of the screens, how the application will navigate from one screen to another (every prototype is a collection of screens, you can think about the screen as a dialog or window) and how it will transit from one state to another. The SketchFlow map shows you all screens composing the prototype and the connections (navigations) between those screens. When you create a new SketchFlow application with Expression Blend 3 you will probably see that map in the center bottom part of the screen, otherwise you can open it from the Window->SketchFlow Map menu.
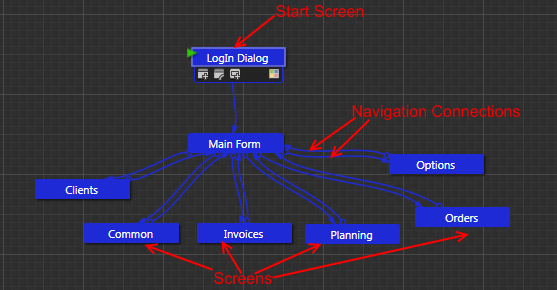
The SketchFlow map shows you all screens composing your prototype and the connections between them. At each moment you can add a new screen to your prototype.
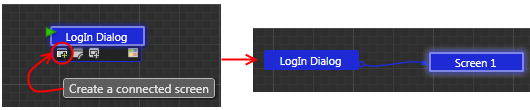
And the new screen is automatically added to your solution.
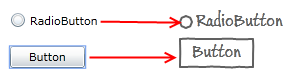
3. Sketch styles for controls
Blend 3 offers you tons of controls for your application (most of them are coming from the Silverlight SDK, or Silverlight Toolkit or other component vendors) which have a nice and polished look. They are good for real applications but not for a prototype. I mentioned the reason in the introduction section – the customer often focuses on the wrong things and also the customer easily tempts into thinking that they are seeing more than there is. That’s why the SketchFlow comes with a built-in sketchy style, which makes controls look as if they were drawn on the white board in the office. Adding to this the various drawing tools and the sticky notes, the designer has a complete set of tools for sketching and prototyping.
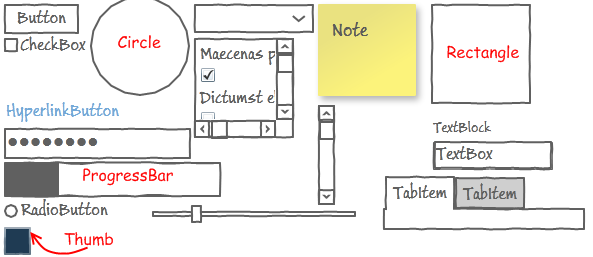
All sketch controls (styles) may be found in the Assets panel (Windows -> Assets), under the node SketchFlow -> Styles -> SketchStyles.
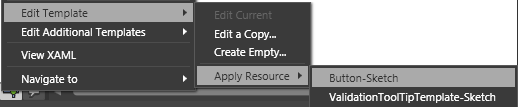
Of course all controls are fully functional, they just have been templated. Also that at any point you may make a standard control to look like a sketchy control – with the right mouse button choose Edit Template.
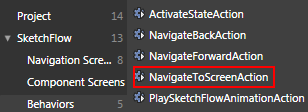
4. Adding navigations
The SketchFlow map shows you all screens, composing your prototype and the connections between those screens. In order your prototype to be complete and to give the customer a full vision about the flow, the customer must be able to navigate (switch) between the different screens. For example you may want to place a “Back” or “Next” button on a specific screen and when the user presses that button to go back on the previous (or the next) screen. You can allow navigations in two ways. First you may use the built in behaviors.
After that in the Properties pane you need to specify the TargetScreen property.
The second way is faster. Just select the target control and in the context menu choose Navigate to.
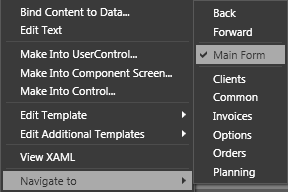
As you can see all available screens are shown, you need to select the desired one. If you want to see the navigation in action, just open the demo.
5. Data binding and sample data
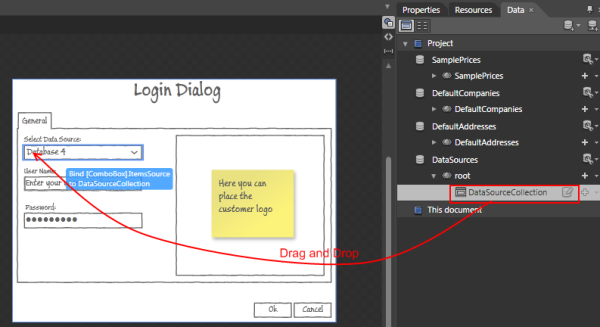
Many of the today applications are data – driven. Making mock up data is sometimes painful, especially if you need to do that for an early prototype. Never more – Blend 3 lets you create meaningful sample data just with a few clicks; you can create working data – bound lists and master – details views just with drag and drop. You can define sample data in the Data pane.
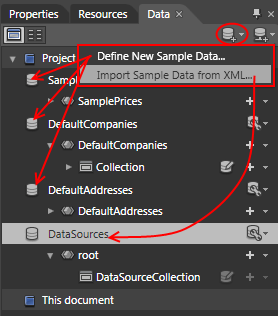
You may import data from a XML file or you may choose to use the built in data which Blend 3 offers you. Binding to a list control is just a piece of cake. Just select the collection and drag it onto the desired control.
6. SketchFlow animation
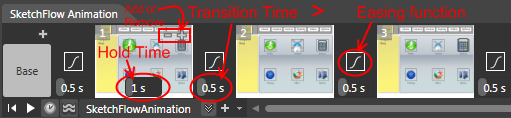
One of the purposes of the prototype is to quickly and easily express your ideas. There is no better way to do this but to use animations. Since you are using Expression Blend 3, you have a complete set of key frame-based animation tools. Key frame animations are powerful but not effective for prototyping. You simply have to create and manage too many frames, and that will slow down your work. That’s why SketchFlow offers you a special type animation called “SketchFlow Animation” which purpose is to show the customer what happens on that screen step by step. By default the SketchFlow Animation pane is placed on the center top part of the screen (just above the main design surface).

You just add a storyboard frame, making your screen look the way you like. Repeat that procedure as many times as you want. It is extremely simple and most important – it is fast. For each storyboard frame you may specify how long to show that frame (Hold Time) and how long to take the transition from the previous frame to the current one (Transition Time). Also the SketchFlow animation allows you to set an easing function for the transition (by default it is Cubic InOut).
You may see a demonstration in the demo. Navigate to the Main Form and run the animation from the Navigate menu. For more information about the SketchFlow Player see the next section.
7. SketchFlow player
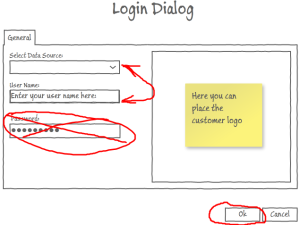
The SketchFlow player is an extremely important part of the prototype. Once you have the prototype ready you may ask yourself how you will interact with the customer. This is what the SketchFlow player is used for. The big advantage is that you don’t need any additional software to run the player (of course you will need the Silverlight plugin installed in your browser). If your prototype is for WPF then the player is an ordinary application. If your prototype is for Silverlight then the player will run in the browser. To see how the player looks like just run the demo. The player allows anybody who explores the prototype to give an immediate feedback. You can insert comments or use ink to draw directly on the prototype.

After that you just turn back the prototype to the designer, who can insert it in the Blend art board. Gathering timely feedback from a client is just as important as creating the prototype. That’s why the player is extremely important part. It helps reducing the time lost and costs in the design and development process. It is freely distributed and can be run on a standard browser. Clients review the prototype, make some tests, provide in context feedback and send back the demo to the designer.
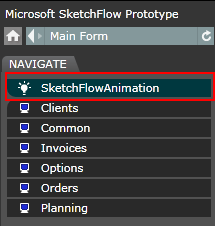
On the left part of the SketchFlow player you will find the Navigate pane which shows you all the available windows thet you can navigate to from the current one. Also it shows you all animations associated with the current screen. Just click the animation and it will be run.
8. Design documentation
Every project needs design documentation. SketchFlow can export your prototype to a Microsoft Word. Just use the File->Export to Microsoft Word command. The document will contain screenshots of the SketchFlow Map, as well as screenshots of every screen you have in the project; table of contents and table of figures.
9. Demo
You can run the SketchFlow demo from here. And don’t forget to drop your feedback; you may do it directly on the prototype.
10. Conclusion
The new Expression Blend offers you a great flexibility to experiment, evolve and demonstrate your concepts and ideas to the clients in the most effective possible way, to create fully interactive and data driven prototypes. You have a total control from concept to completion. I think the Expression Blend team has made a huge step in the right direction. If you have any further questions, please share them with us. For more information and additional links, see the References section.
11. References
- http://expression.microsoft.com/en-us/ee215229.aspx
- http://electricbeach.org/?p=214
- http://electricbeach.org/?p=145
- http://videos.visitmix.com/MIX09/C01F
- http://blogs.msdn.com/expression/archive/2009/03/18/a-look-at-sketchflow.aspx
- http://www.orbifold.net/default/?p=2338