The most prominent change in Windows Phone 8 (and 7.8 for that matter), because it's immediately visible to everyone at first glance, is the redesigned start screen with the new sizes for live tiles. In Windows Phone 7, the only option we had were square-sized tiles. Yes, phones had large landscape tiles too (for example for the pictures app), however these were not accessible to third-party developers. With Windows Phone 8, we now have three available sizes for tiles at hand, and we also can choose between multiple templates to get different looks more easily. Best of all, as we will see in this article you can even make use of a lot of the new tile features even if your app does not target Windows Phone 8 or 7.8, but only 7.1. Another feature that is tightly related to tiles (even though it may not seem like that at first) is the new lock screen notification options that we will look at in the second half of this article.
New Tile Sizes
In addition to the tile size we are used to from Windows Phone 7 (which is now named the "medium" size), Windows Phone 8 comes with two additional sizes, small and wide:
When you create a new Windows Phone 8 app, you can choose the kind of support for tiles in your app comfortably by editing the WMAppManifest.xml (look for the tile options on the "Application UI" tab). Providing support for the small and medium size tiles is mandatory, but you can choose whether you want to support wide tiles or not explicitly:
Depending on your settings here, the user can then freely select the size of the tile when they pin your app to the start screen:
Apart from the title and background image, you can also work with other properties to change the appearance of your tile. This concept is not new; in Windows Phone 7 we already could create tiles that had a front and a back site, and we were able to set a counter value that showed as small overlay. In Windows Phone 8 however, we have a choice of multiple available templates that have distinct properties to create unique tile designs.
The New Tile Templates
The tile format we have in Windows Phone 8 that is closest to what we are used to from 7.1 is called "flip tile". It provides the same properties as before, but additionally now supports the small and wide sizes.
One detail that you will realize with the new tile formats is that the involved physical sizes are significantly different from before. In Windows Phone 7 the tile size already was a somewhat unconventional 173x173 pixels. The corresponding medium tile size in Windows Phone 8 is 336x336 pixels. This is a side effect of the newly supported higher screen resolutions we have in Windows Phone 8, something you can read about in one of my articles here on SilverlightShow in detail [1]. For smaller resolutions like WVGA, the content of the tile is scaled down automatically. You as a developer always have to provide the largest theoretical size required. Please see below for a table that lists all content sizes, depending on the tile template.
The second template available lets you cycle through up to 9 images from the local app installation. It's hence named "Cycle Template":
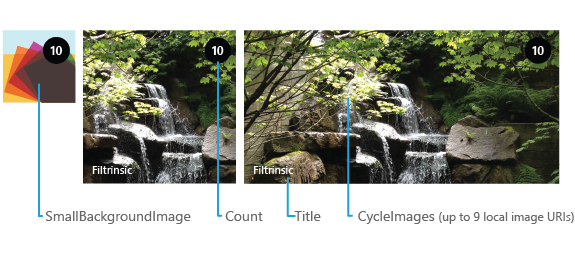
Finally, there is the "Iconic Template" that makes it easier for you to style your tile for the plain and simple design language inherent to the phone platform:
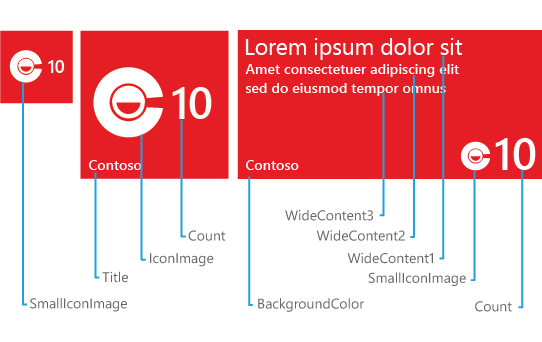
(Tile template images taken from MSDN [2])
Due to the multiple tile sizes, you now also have to provide differently sized images for all the tiles your application supports. Since supporting small and medium sizes is mandatory, that would be at least two images. In detail:
| |
Flip tile/Cycle tile |
Iconic tile |
| Small* |
159x159 |
110x110 |
| Medium* |
336x336 |
202x202 |
| Wide |
691x336 |
no additional image |
*=mandatory
How to Use the New Tiles
In the introductory part we've already seen how you can statically define the tile images to use in the WMAppManifest.xml editor. This of course is the most comfortable way to do this, and the editor adapts automatically depending on what template you choose.
For example, when you switch to the Cycle template, you are now free to select up to 9 images in the editor:
When you take a look at the generated XML, you can see how the tile data is declared behind the scenes:
Here you could change more of the available options if you wanted. However, a lot more interesting is the possibility to change tile properties in code dynamically. This is where the real power of tiles comes from, when you change the content and information that is shown on tiles depending on e.g. the data available in your application. And of course only manipulating tile data programmatically lets you work with multiple (secondary) tiles. A typical use case for these tiles is a weather app for example, that can show data specific to a certain location on a separate tile. It can also use the tile as a direct entry point to a specific part of the application for the user, without the need to navigate through the normal menu and application structure first. Again this concept is nothing new for Windows Phone developers, however the new tile types of course add new classes we have to work with to interact with them. For example, to set up a new flip tile, you can write code like this:
1: private void PinToStartScreenButton_Click(object sender, RoutedEventArgs e)
2: {
3: var navigationUri = new Uri("/MainPage.xaml", UriKind.Relative);
4:
5: var flipTileData = new FlipTileData
6: {
7: BackgroundImage = new Uri("/Assets/Tiles/FlipCycleTileMedium.png", UriKind.Relative),
8: SmallBackgroundImage = new Uri("/Assets/Tiles/FlipCycleTileSmall.png", UriKind.Relative),
9: Title = "Demo Tile",
10: Count = 42
11: };
12:
13: // check if tile exists first
14: var tile = ShellTile.ActiveTiles
15: .Where(t => t.NavigationUri == navigationUri)
16: .FirstOrDefault();
17:
18: // create or update tile
19: if (tile == null)
20: {
21: // create a new tile
22: ShellTile.Create(navigationUri, flipTileData, true);
23: }
24: else
25: {
26: tile.Update(flipTileData);
27: }
28: }
The snippet also shows how to check for existing tiles, so you don't create multiple versions of the same tile over and over again. Instead, you can use the "Update" method of the "ShellTile" class to change the content of an existing tile. One thing that's really important is that you need to use the specific overload of the "Create" method that takes a third (boolean) argument [3] when you use one of the new tile data classes. That third argument indicates whether you support the new wide tile size or not. If you try to use the other, previously existing "Create" overload with one of the new tile data types, you'll receive an exception – it's only allowed to use the old Windows Phone 7 standard tile data class with it.
In addition to the "FlipTileData" [4] shown above we of course also have the new types "CycleTileData" [5] and "IconicTileData" [6] now.
Using the New Tiles in Windows Phone 7.1 Apps
If your app does not target Windows Phone 8 exclusively but is designed to work on Windows Phone 7.1, you can use the power of reflection to still support the new tiles without breaking support for the older operating system version. This is a nice compromise for developers who only would like to use these new visual features but on the other hand don't want to lock out the existing user base of Windows Phone 7.1 (or maintain multiple app versions just for that). The very same concept of reflection is used to support the new live tiles on devices that run version 7.8 of Windows Phone. Following the logic shown below hence covers both use cases:
To make this work you also have to manually change the WMAppManifest.xml and add a separate element prior to the "App" element for this:
1: <AppExtra xmlns="" AppPlatformVersion="8.0">
2: <Extra Name="Tiles"/>
3: </AppExtra>
Obviously working with reflection, dynamically creating types and invoking properties, is not that much fun, but it's also not as bad as it sounds. A separate page on the MSDN documentation has straight-forward sample code to get you started, and also talks at length about what limitations you have to consider when you work with the new tiles that way [7].
By the way, Microsoft has just released a Phone SDK update for version 7.8 [8] that adds additional emulators you can use to test how your 7.1 app tiles look like on 7.8 devices. The announcement of the SDK update was accompanied by an additional post that talks about this "light up" feature a bit more in detail [9]. And even if you don't feel comfortable with reflection at all, don't worry. First projects are already starting to show up to help you wrap the involved bits comfortably, like the Mangopollo project [10].
The Lock Screen
The other very prominent visual change on Windows Phone 8 is the fact that applications now can tightly integrate with the lock screen functionality. Your app can act as a provider for lock screen background images, a custom text, as well as appear with a counter value there, to give the user a quick hint e.g. when new data is available in your app. These features were limited to the built-in apps (phone, texts, calendar, email etc.) before, now third party developers can offer the same features with their own apps.
To support these features, you have to specify them in your WMAppManifest.xml file. There are separate entries for each one of the available options, to be provided in an "Extensions" element below the "Tokens" element:
1: <Extensions>
2: <!-- Use this entry to indicate background image provider support -->
3: <Extension ExtensionName="LockScreen_Background"
4: ConsumerID="{111DFF24-AA15-4A96-8006-2BFF8122084F}"
5: TaskID="_default" />
6: <!-- Use this entry to indicate icon counter notification support -->
7: <Extension ExtensionName="LockScreen_Notification_IconCount"
8: ConsumerID="{111DFF24-AA15-4A96-8006-2BFF8122084F}"
9: TaskID="_default" />
10: <!-- Use this entry to indicate text notification support -->
11: <Extension ExtensionName="LockScreen_Notification_TextField"
12: ConsumerID="{111DFF24-AA15-4A96-8006-2BFF8122084F}"
13: TaskID="_default" />
14: </Extensions>
If you want to make use of the counter notifications, you additionally need to provide an icon that is shown together with the actual counter value. It can only contain white pixels on a transparent background and needs to be a 38x38 pixels PNG file that you have to specify in the "DeviceLockImageURI" element of your primary tile:
1: <DeviceLockImageURI IsRelative="true"
2: IsResource="false">Assets\LockImage.png</DeviceLockImageURI>
The fact that you have to add this information to the tile data of your app already is a hint that the notification data on the lock screen really is only another view of the information on your (pinned) primary tile. The lock screen data is directly extracted from there. Hence, updating what the user sees on the lock screen comes down to simply updating the tile:
1: var primaryTile = ShellTile.ActiveTiles.FirstOrDefault();
2: if (primaryTile != null)
3: {
4: var tileData = new FlipTileData
5: {
6: Count = 42,
7: BackContent = "Demo text"
8: };
9:
10: primaryTile.Update(tileData);
11: }
As you can see in the above screenshot, the "Count" value is used for the small icon indicator, the "BackContent" of your tile will be mapped to the custom text that is displayed.
User Consent
One important thing is that you cannot set your app as lock screen data provider programmatically. This follows the usual concept of the phone platform where certain actions can only be performed with user consent or even by the user manually. In the case of notifications, the user has to set your app as one of the data providers in the "lock screen" system settings:
What you can do however, is navigate the user to that screen programmatically, to make it easier for them to discover the corresponding options in the system settings. The code for this simply looks like:
1: private async void NavigateToLockScreenSettingsButton_Click(object sender, RoutedEventArgs e)
2: {
3: await Windows.System.Launcher.LaunchUriAsync(new Uri("ms-settings-lock:"));
4: }
If your application wants to act as a lock screen image provider, you have more options; in particular, you can use the "LockScreenManager" class [11] to request the required user consent directly. There's a more sophisticated example available on MSDN that also shows how to use this class in conjunction with the "LockScreen" class [12] to actually manage the image handling from within your app [13].
Conclusion
Both the new lock screen and tile features proof that it's possible to open the phone platform to more customization options without giving up or sacrificing the consistent and unique user experience of Windows Phone. For you as a developer the new features make it possible to add functionality to your app that a lot of users have been waiting for, in particular integrating more deeply with the core notification elements of the system. Combined with existing concepts like push notifications this allows to build exciting apps and experiences.