Are you interested in
creating games for Windows Phone 7 but don't have XNA experience?
Watch the recording of the recent intro webinar delivered by Peter Kuhn '
XNA for Windows Phone 7'.
This article is part 9 of the series "XNA for Silverlight developers".
This article is compatible with Windows Phone "Mango".
Latest update: Aug 1, 2011.
Until now, we have looked at individual features of game programming on the phone in an isolated manner. We learned about graphics, animations, input, audio and others, and for each of these samples, we created new empty game projects and put the logic in the main game screen and few helper classes. In a real world scenario, your game will combine various different aspects and features, and you naturally would want to structure your game a lot more. Once again some of these details are also subject to restrictions given by the certification requirements. In this article, we will take a look at the concept of "places" and game screens that can be used to create a navigational structure for your game. As always you can download the source code at the end of the article.
Certification requirements
In the official guidelines and certification documents from Microsoft games are treated separately in a lot of ways, and they in fact are at liberty to do things normal applications are not allowed or able to do. One particular noteworthy statement can be found in the UI Design and Interaction Guide in the section about game UI design:
For full-screen games, developers are free to implement whatever in-game UI elements they see fit.
This pretty much gives you the freedom to create any UI concept you want for your game as long as it is not an integrated part of a normal application (i.e. not full-screen). If you look through some of the games available in the market place today you can see that developers actively make use of this. Aside from "classic" menu systems that resemble normal Silverlight application design you will notice that there are quite a few that go new ways in terms of user interaction.
The Application Certification Requirements on the other hand make some clear statements on games though. In particular, section 5, which describes the actual requirements, is prefaced with the following note:
These requirements apply equally to an application that implements game functionality,
commonly referred to as a game.
The decisive part for navigational concepts is located in section 5.2.4 which describes the use of the back button. So, even though your game is free in its UI design and pretty much has to implement navigation manually, you have to follow basic requirements when it comes to navigation, like that pressing the back button on the first screen must exit the game. In addition, there is a requirement specific to games in that section:
d. For games, when the Back button is pressed during gameplay, the game can choose to present a pause context menu or dialog or navigate the user to the prior menu screen. Pressing the Back button again while in a paused context menu or dialog closes the menu or dialog.
This is an interesting exception to the normal rules for applications: instead of navigating back to the previous page, you are actually allowed to open a new dialog when the user presses the back button during game play.
The concept of places
Even though XNA games do not integrate with the built-in concept of pages and the back stack of Windows Phone 7 applications, and you have to create your navigation concept manually, it's well worth taking a look at how this is normally done in Silverlight. After all you will run into many similar questions as with normal apps, and you likely want to offer your users an experience that is similar to what they find on the rest of the phone. Peter Torr has posted an interesting article on something he calls "places" within an application. You can find it here, and if you don't know it you should definitely read it. It deals with some common problems and solutions around the navigation concept on Windows Phone 7. While the default stack behavior of the navigation works well in a lot of situations, there are some situations where this inevitably causes problems. Many of these points also apply to games. Let me give you some examples:
- You don't want to take the user all the way back to your game's splash screen when they use the back button. The main game screen or menu should be the starting point of your game, and pressing back from there should exit the game, even if you initially showed a splash screen before the main menu on startup.
- You don't want certain dialogs to appear again if the user navigates back. For example, imagine you prompt the user to enter a name for a high score list. If they decide to navigate back from the high score list later, you want to skip over that dialog.
- If your game is segmented into levels, it's likely that once the user has finished one, you prompt them to start the next one or show some intermediate/summary information in between levels. If the user navigates back from the main game screen, you however want return to the menu of course, and not back to those intermediate level transition screens.
So it's obvious you need to think about the navigation flow through your game and what screens you want to make distinct "places". Peter's above linked post assists and tries to give you some clues how to make this task easier, for example by asking questions like: "Would the user explicitly want to visit this screen? Would the user remember they were on this screen, and want to return to it?" This is the conceptional work you have to do before you actually start implementing your game's architecture.

This is a sample of what paths a user could take through the different screens of a game. As you can see there are a lot of situations where a stack concept works very well (the whole options section, for example). In other places sub-elements need to be left out of the stack (individual levels of the gameplay). And then there are situations where you need to find a way to break out of the stack concept completely (splash screen, from a finished game to the high scores and back to the main menu).
Game screens and a Screen Manager
Individual game screens and having some sort of manager that controls the currently active screens is something common in games, and I have used it for many years. It was in fact something I already described in my first game programming tutorial ten years ago. For Windows Phone 7 Microsoft provides its own sample for that, and it's really worth investigating because it's well thought-out and a good start to build upon. That sample is named "Game State Management" and can be found in the App Hub:
http://create.msdn.com/en-US/education/catalog/sample/game_state_management
When you download and simply run that example you can see that it has most of the above already covered: you see a main menu with some entries that take you to an options screen or to the actual game. The screens use nice transition effects like fade in/out as well as animations. There's an intermediate loading screen for long-running actions which of course is skipped when you navigate backwards, and the back button is fully functional. Let's dissect this sample to see how it works.
The Game Screens
All screens in the game derive from a base class "GameScreen" that handles most of the work required for the transitions, and it provides a bunch of virtual methods you can override to plug-in your own logic for loading and unloading content, processing input as well as update and draw your content. There are additional methods for topics we haven't covered yet, like serializing and deserialization, and some more convenient methods and properties. All other game screens in the sample make use of this base class and override the default behavior and properties to create their own functionality:

The interesting part is that this small example already shows the flexibility of this system. For example, the "BackgroundScreen" is a very static screen that only shows the background image for the menus. It does not participate in transitions at all, thus creating a consistent look between the different menus. The user doesn't really perceive the menu screens as isolated parts because the background acts as a bridging element for all of them. On the other hand, the menus show that this concept includes the ability to have multiple screens visible at once; they are only put on top of the background screen, and together they form the final user experience.
The "LoadingScreen" also is a special screen in that its only purpose is to handle the transition between other screens while displaying a notification to the user. It has some built-in logic to wait for all the current screens to transition off, tell the screen manager to load the follow-up screens and eventually remove itself. In the sample this is used to load the "GameplayScreen", where the actual game itself "happens". This of course is the most important screen of them all, because all your game's logic will be implemented and/or used here. This is the place where we would add what we have learned in all the previous parts of this series so far.
Finally there is the "MessageBoxScreen", which isn't even used in the sample (we'll add it in a minute). It demonstrates how to use the concept of having a "Popup" in the screen management. This is another feature that allows you to build additional overlay screens like notifications or to ask the user for confirmation.
The Screen Manager
The "ScreenManager" class in the project is the workhorse that does everything necessary to maintain the current list of screens, handling user input and similar things correctly. It also offers some convenient properties, like global font and sprite batch objects. Since each screen has a reference to the screen manager, they don't have to bother creating their own fonts for example (which of course they still could). In addition to the properties, it has public methods to add and remove screens which are used by the individual screens to initiate the transitions to different parts of the game.
Note: This design decision may seem odd to some at first, because it means the game screens know each other, and control about the flow through the game is distributed across all involved screens. However, it makes a lot of the other available features much easier. I've seen more generic implementations of this concept, where screens don't know about each other and control of transitions is handled in a central place; what sounds like a good idea at first will quickly result in unnecessary difficulties for certain features and over-complicate things in a lot of ways, which especially on the limited phone platform is very undesirable. The number of screens for a game usually won't grow sky high, and normally a "natural" grouping of screens will evolve automatically too (there's no point in jumping from a network configuration screen to the high scores or the gameplay directly) – which will result in a limited set of transition points and keep the structure maintainable.
The logic of the main menu screen is an example of various possible options to control the game flow:
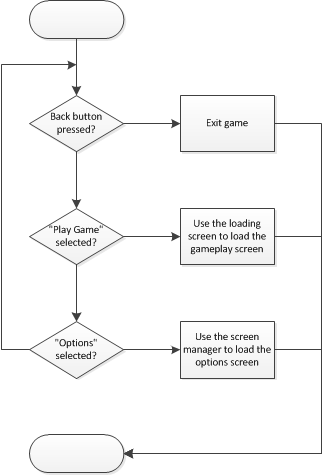
If the back button is pressed, the game is simply exited (contrary to the situation in Silverlight, it's possible to explicitly exit an XNA game). If the user wants to play a new game, the main menu screen makes use of the loading screen to transition to the gameplay. This is necessary because loading all the game content may take a while and a notification should be presented to the user (the sample simulates this by letting the current thread sleep for a while). Behind the scenes, the loading screen uses the screen manager for the necessary transitions. If the user wants to look at the game's options however, the main menu uses the screen manager directly to transition to the next screen:
1: void OptionsMenuEntrySelected(object sender, PlayerIndexEventArgs e)
2: {
3: ScreenManager.AddScreen(new OptionsMenuScreen(), e.PlayerIndex);
4: }
The core of the screen manager is the update mechanism. A list of all currently active screens is maintained and processed in reverse order, which means the screen on top is handled first. The screen manager ensures that only the top most screen gets a chance to process user input, and that all screens further down the stack are notified they are covered by other screens, so they can act accordingly (like pause whatever is happening, for example). The draw mechanism on the other hand is pretty simple. The screen manager only iterates over the current screens and in turn calls their draw methods.
The last detail is how the screen manager is integrated into the game. When you look at the game class you will see that it contains next to no logic. In fact it doesn't even have an own update method anymore. The crucial part happens in the constructor, where the screen manager is instantiated and added to the game components:
1: // Create the screen manager component.
2: screenManager = new ScreenManager(this);
3:
4: Components.Add(screenManager);
This is something we haven't used until now. Game components are a way of modularization. You can create game components by deriving from the base classes provided by XNA, and then adding the components to your game class as shown above. All game components registered like this will then be maintained by the game and have their initialize, update and draw (if applicable) methods called automatically. This is a way of keeping your main game code lean and the overall project design better structured. When you look at the screen manager class in more detail you will realize that it indeed derives from the DrawableGameComponent class to enable this feature.
Sample
To get more accustomed to the principle and structure of the game state management example, and to show you how you can use and extend it for your own games, we're going to add a new screen now: a high scores list. The first thing to do is add a new class to the Screens folder and make it derive from the "GameScreen" base class. If you use the "override" keyword you can take a look at your options:
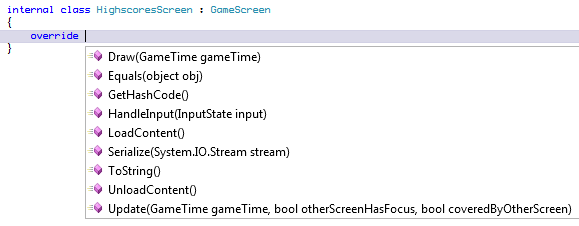
What we are going to do is create some fake high score data in the "LoadContent" method. In a real game this is where you would hit a web service instead, for example. The "Update" method does the layout of the items, and the "Draw" override will draw the high scores list on the screen. Since none of these steps contain anything new to us, I don't show the code here.
To integrate the new screen with the game, we extend the "MainMenuScreen" by adding another menu entry. We haven't talked about menu systems yet (that will be part of an upcoming article), so I won't go into details here. If you look at how the other menu items are created it's easy to figure out how to set up a new one though:
1: // in the "MainMenuScreen" constructor
2: // add a new entry for the high scores
3: MenuEntry highscoresMenuEntry = new MenuEntry("High Scores");
4: highscoresMenuEntry.Selected += HighscoresMenuEntry_Selected;
5: MenuEntries.Add(highscoresMenuEntry);
6:
7: ...
8:
9: void HighscoresMenuEntry_Selected(object sender, PlayerIndexEventArgs e)
10: {
11: ScreenManager.AddScreen(new HighscoresScreen(), e.PlayerIndex);
12: }
When the new entry is selected, we use the screen manager to add a new instance of the high scores screen. In the following, we'll look at two more interesting aspects with game screens.
Input and a Message Box
To deal with user input, you can override the "HandleInput" method. The argument to that method is an "InputState" object that is a convenient wrapper of the sample project around the currently pressed keys and current gestures. One thing you need to do is handle the back key. When the user presses this key, we simply exit the high scores screen. If the user however taps anywhere on the screen, we want to show a message (to put the included MessageBox screen to some use).
1: public override void HandleInput(InputState input)
2: {
3: base.HandleInput(input);
4:
5: // if the user presses the back button, we exit from the high scores
6: // this will re-activate whatever screen was active before (=> main menu)
7: PlayerIndex player;
8: if (input.IsNewButtonPress(Buttons.Back, ControllingPlayer, out player))
9: {
10: ExitScreen();
11: }
12:
13: // look for any taps that occurred and show a message box as response
14: foreach (GestureSample gesture in input.Gestures)
15: {
16: if (gesture.GestureType == GestureType.Tap)
17: {
18: // a very simple message box
19: var messageBox = new MessageBoxScreen("A message!", false);
20: ScreenManager.AddScreen(messageBox, ControllingPlayer);
21: }
22: }
23: }
This code snippet demonstrates how to use the screen manager to add a new screen to the stack. It also shows that we don't need to bother what happens after we exit the current screen. The screen manager will handle this situation for us and transition the underlying screen back in (the main menu).
The final step to make this work is to define that we are interested in processing tap gestures. This can be controlled for each screen separately by setting a corresponding property in its constructor (again the screen manager will do the rest for you):
1: public HighscoresScreen()
2: {
3: // we are interested in receiving tap gestures
4: EnabledGestures = GestureType.Tap;
5: }
When you run the sample you can see that pressing the back key returns to the main menu, and tapping the screen opens a message box.
Transitions
At the moment the main menu uses nice transitions when it becomes active or inactive, but the high scores just suddenly appear and disappear. Especially when the screen appears it's overlapping with the fading content of the main menu which doesn't look nice. Let's see how we can make use of the built-in transition features to improve this.
First of all, similar to enabling input gestures, you can tell the screen manager what duration you want for the screen's transitions by setting some properties in the screen constructor:
1: TransitionOnTime = TimeSpan.FromSeconds(0.5);
2: TransitionOffTime = TimeSpan.FromSeconds(0.5);
With this in place, you can then make use of base class properties like the "ScreenState" and "TransitionPosition". With the first one you can do a basic check to see if the screen is currently transitioning (on or off), and the second value ranges from 0.0f to 1.0f to describe how far you're into the transition, with 0.0f describing an active screen and 1.0f being fully transitioned off. You can make use of this value to calculate an animation offset or similar, for example. In addition, "TransitionAlpha" can be used to create a (linear) alpha fade effect based on the current transition position.
In our sample, we calculate the offset from the top of the screen depending on the transition position in the "Update" method of the high scores screen. In addition, in the "Draw" method we control the alpha value of the drawn text by the transition alpha value.
1: // in the Update method:
2: // top offset
3: float y = 100.0f;
4:
5: // are we transitioning on/off?
6: if (ScreenState == ScreenState.TransitionOn || ScreenState == ScreenState.TransitionOff)
7: {
8: var screenHeight = ScreenManager.Game.GraphicsDevice.Viewport.Height;
9: var distance = screenHeight - y;
10:
11: // calculate a new offset depending on the transition value
12: y += distance * TransitionPosition;
13: }
14:
15: ...
16:
17: // in the Draw method:
18: // determine color
19: Color color = new Color(255, 255, 255) * TransitionAlpha;
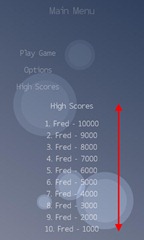
The result is that the high scores list now slides in and out from and to the bottom, and at the same time the transparency of the high score entries is varied.
Summary
By structuring your game using a concept of "places" and screens, you achieve a lot in terms of both user experience and maintainability of your project when it grows. With the Game State Management sample Microsoft already provides a pretty sophisticated mini-framework you can use to built upon or at least to get some ideas for your own implementation. With little work you can extend these classes and – by moving them to a class library – even easily reuse them for future projects. Download the source code below to get the additions we've seen in the last parts of the article. If you have any questions or feedback, please feel free to post your comments or contact me directly.
Download Source Code
About the author
Peter Kuhn aka "Mister Goodcat" has been working in the IT industry for more than ten years. After being a project lead and technical director for several years, developing database and device controlling applications in the field of medical software and bioinformatics as well as for knowledge management solutions, he founded his own business in 2010. Starting in 2001 he jumped onto the .NET wagon very early, and has also used Silverlight for business application development since version 2. Today he uses Silverlight, .NET and ASP.NET as his preferred development platforms and offers training and consulting around these technologies and general software design and development process questions.
He created his first game at the age of 11 on the Commodore 64 of his father and has finished several hobby and also commercial game projects since then. His last commercial project was the development of Painkiller:Resurrection, a game published in late 2009, which he supervised and contributed to as technical director in his free time. You can find his tech blog here: http://www.pitorque.de/MisterGoodcat/