Note: This article is submitted by Umesh Patel for Silverlight: Write and Win contest.Thanks a lot, Umesh! Hello All, Please drop a comment if you like it.
1. Introduction
Microsoft Silverlight uses the WebClient class to send HTTP requests to remote scripts, which allows the application to perform specific web server functions, such as retrieving files. Remote scripts, created with Active Server Pages (ASP) and Personal Hypertext Processor (PHP), add an additional layer of functionality with direct access to the remote server, such as the file system. In this article, I will demonstrate an application that utilizes the WebClient class to retrieve and display files from a remote server. The article also shows some fun features to enhance the application including Data Binding and a Sample Syntax Highlighter.
1.1 The Non-Silverlight Approach
I developed the Source Code Viewer application using PHP, AJAX, and MySQL. The application allows the end users to browse a collection of source code in a category-style manner. Using AJAX, the page remains stationary as the data is pulled and processed from a MySQL database. The users can browse through the categories to search for files.
There are a couple of concerns in regards to this implementation:
- Modifying and adding files requires constant database changes
- MIME types have to be modified to ensure that the file types are read
- The files have direct hyperlinks
The original Source Code Viewer can be found at: http://www.bayprince.com/sourcecode.
1.2 The Silverlight Approach
I chose to use Silverlight to develop an interactive layer to the Source Code Viewer application.
The Silverlight version contains three primary components:
- Display the list of allowed categories using a file path to category relationship.
- Remote Script to display the list of files in the selected folder
- Render the selected file based on file type
The Silverlight Toolkit has a TreeView control, which is perfect for showing hierarchy data. The control is easily customizable to develop a File Explorer style interface. The Toolkit is conveniently located at http://www.codeplex.com/Silverlight.
The Remote Script retrieves data from the server and renders its output in the form of xml, which can be imported into the Silverlight application. The script performs validations to protect the necessary files and stores the file details into the xml output.
Silverlight has a nice collection of built-in controls and supports rapid development of custom controls. Developing custom controls for specific file types, such as text files, images, and media, allows supporting those types without the need to configure the MIME type entries. For example, Python (py) files on my server are executable by default. It would be beneficial to render those files as text for viewing.
2. Introducing Remote File Viewer
Remote File Viewer is an online application that allows users to browse files on a remote server. I currently use the application to share my source code to students and fellow developers. I manage a single xml file for the category system to inform the application on what categories to display to the end user. The user chooses a category and is presented with a list of files in the category. The list of files is pulled from the remote script that finds the valid files in the respected directory. The user can select a file and view its contents, including basic file information such as File Size and Last Modified.
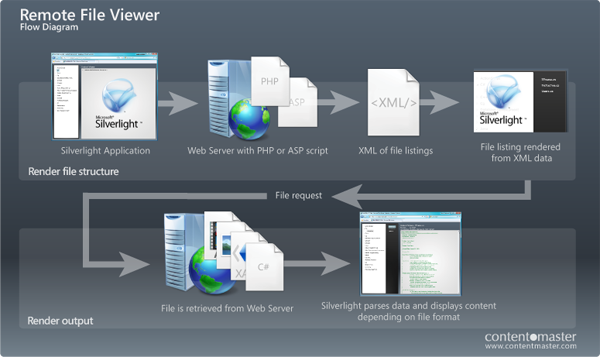
Remote File Viewer Flow Diagram
2.1 Current Version
The current version of the Remote File Viewer renders source code files, images, and Deep Zoom output. Source Code files are assumed to be ASCII text files. Remote File Viewer has basic syntax highlighting for comments and strings. This allows the code files to appear more dynamic rather than the common text document. Images are rendered using the built-in Image control. The Deep Zoom approach is different because it searches specifically for the dzc_output.xml file to render its output using a standard Deep Zoom template. Additional file types, such as media, can easily be integrated using the framework.
2.2 Remote File Viewer Demo
You can check out the live demo here. The demo will allow you to browse source code text files, images, and Deep Zoom outputs located on my server.
The following file types are supported, along with their respected categories on my server:
- Text: Everything except for the Images category
- Images: Images / Raina Tracer / Scenes category
- Deep Zoom: Images / 3D Modeling category
Online Demo
Download Source
3. Before Getting Started
3.1 Required Technologies
You will need the Silverlight Toolkit to use some of the necessary controls, including TreeView and DockPanel. The Toolkit can be downloaded at http://www.codeplex.com/Silverlight.
3.2 Testing Remote Code
You will need to run the application (xap) on a remote server otherwise the application will throw a SecurityException exception during any calls to the remote script. The supplied version of the project was designed for my domain, however you can customize the xml file to point to folders on your server.
3.3 Selecting a Server-Side Scripting Language
You can use ASP, PHP, or any other server-side scripting language that can perform tasks on the web server and produce an output. I chose to use PHP for this application, but the same concepts will work for other server-side scripting languages.
4. Implementing the Remote Script
The script must define its Content Type as text/xml to ensure that the output is rendered as XML content.
1: header("Content-type: text/xml");
A single HTTP parameter is passed into the script to store the requested relative path, which will be appended to the script’s actual relative path to the files. The parameter is validated to ensure that the path exists on the web server.
1: // HTTP Parameters
2: $currentFolder = $_REQUEST['dir'];
3:
4: // Prevent access to parent folders
5: $i = stripos($currentFolder, "./", 0);
6: if ($i > -1)
7: $currentFolder = "";
8:
9: $REL_PATH = "../sourcecode/files/";
10: $dir = $REL_PATH . $currentFolder;
11:
12: // Validate that the folder exists
13: if (file_exists($dir) == FALSE) {
14: $currentFolder = "";
15: $dir = $REL_PATH;
16: }
The heart of the script is the generation of the XML content. The script loads the files in the path by calling the pathinfo and fileinfo APIs. The APIs may differ with other scripting languages. The file type is determined by comparing the file extension in the IGNORE_FILES and BINARY_FILES arrays. Each file is then entered as a single entry of the xml file.
1: $IGNORE_FILES = array("exe", "swf", "zip", "vsd", "php", "inc", "mll","htm", "html");
2: $BINARY_FILES = array("jpg", "png");
3:
4: $xml = "<?xml version=\"1.0\"?>\n";
5: $xml .= "<files dir=\"$currentFolder\">";
6:
7: if ($handle = opendir($dir)) {
8: // Loop through files
9: while (false !== ($file = readdir($handle))) {
10: $p = $dir . "/" . $file;
11:
12: if ($file != "." && $file != ".." && is_dir($p) != 1) {
13: // Validate extensions
14: $pathInfo = pathinfo($p);
15: $file_ext = $pathInfo['extension'];
16:
17: // Get file information
18: $fileInfo = stat($p);
19: $fileSize = $fileInfo['size'];
20:
21: $modifiedDate = date ("m:d:Y:H:i:s", $fileInfo['mtime']);
22:
23: // Validate if the application supports the file
24: if (in_array($file_ext, $IGNORE_FILES)) { continue; }
25:
26: // Determine file type
27: $type = "";
28:
29: if (in_array($file_ext, $BINARY_FILES)) { $type = "image"; }
30: else { $type = "text"; }
31:
32:
33: // Output File to XML
34: $xml .= "<file file=\"$file\" type=\"$type\" bytes=\"$fileSize\" lastModified=\"$modifiedDate\" />";
35: }
36: }
37: closedir($handle);
38: }
39:
40: $xml .= "</files>";
41:
42: print $xml;
5. Designing the User Interface
The User Interface consists for three primary sections: Category Tree, File List and the Render Control. The Category Tree is the TreeView Control that is data bounded to the local category xml file. The File List is rendered after the user selects on the category and the data is brought back from the server. The Render Control is a UserControl object renders the output based on the file type.
5.1 Defining the Category Data
The primary category data is the compiled hierarchical list of the categories that will be in the application. Each category has a name, file path, and a list of child categories. There will be some categories that only contain child categories and no files. By setting their file path to an empty string, the application will know to ignore server processing for those categories.
The following XML file shows two categories: C# and Silverlight Development. Both categories have a child categories with files. The dir attribute in the XML is the relative path of the files. This path will be appended to an absolute path location in the C# code. We will data bound this XML file to the Category Tree.
1: <categories>
2: <category name="C#" dir="">
3: <children>
4: <category name="TicTacToe" dir="csharp/tictactoe">
5: <children />
6: </category>
7: </children>
8: </category>
9: <category name="Silverlight Development" dir="">
10: <children>
11: <category name="Remote File Viewer" dir="silverlight/rfv">
12: <children />
13: </category>
14: </children>
15: </category>
16: </categories>
5.2 Category Tree
The TreeView control is part of the Silverlight Toolkit. The Microsoft.Windows.Controls.dll is required in your project’s References to use the control.
The following reference is added to the list of namespaces in Page.xaml.
1: xmlns:y="clr-namespace:Microsoft.Windows.Controls;assembly=Microsoft.Windows.Controls"
The following code snippet defines the TreeView Control and prepares it to be data bounded to the previously created xml. The TreeView Control uses the HierarchicalDataTemplate object to render the category children data. The SelectedItemChanged event is attached to the control to capture the user’s selection.
   1: <y:TreeView x:Name="listCategories" Background="Transparent" BorderBrush="Transparent" BorderThickness="0"
          SelectedItemChanged="listCategories_SelectedItemChanged">
2: <y:TreeView.ItemTemplate>
3: <y:HierarchicalDataTemplate ItemsSource="{Binding Children}">
4: <TextBlock Margin="0" Text="{Binding Name, Mode=OneWay}" FontSize="12" />
5: </y:HierarchicalDataTemplate>
6: </y:TreeView.ItemTemplate>
7: </y:TreeView>
5.3 File List
The File list becomes visible after the data is retrieved from the remote script. The list allows the user to select on the file to view in the Render Output control. This list is hidden if the category contains no files.
The following code snippet shows the data bounded ListBox.
   1: <ListBox x:Name="listFiles" Margin="20" Background="Transparent" BorderBrush="Transparent"
          SelectionChanged="listFiles_SelectionChanged" Visibility="Collapsed">
2: <ListBox.ItemTemplate>
3: <DataTemplate>
4: <TextBlock Margin="0" Text="{Binding File, Mode=OneWay}" Foreground="White" FontSize="10" />
5: </DataTemplate>
6: </ListBox.ItemTemplate>
7: </ListBox>
5.4 Render Control
The Render Control is a UserControl that will render the file output based in the file type. The Remote File Viewer supports text, images, and deep zoom output. Text is processed through a lightweight syntax highlighting pass for string and comments notation. Images are rendered using the built-in Image control. Deep Zoom objects are loaded into the custom Deep Zoom application with the generic functionality. Other file formats can be supported by adding their output panels in this control.
The following code snippet shows the controls use to render the file outputs. The current file type refreshes the user interface by toggling the visibility of the other controls.
1: <ScrollViewer x:Name="scrollViewer" BorderThickness="0" BorderBrush="Transparent" VerticalScrollBarVisibility="Auto">
2: <Grid>
3: <StackPanel x:Name="panelProgress" Margin="0" VerticalAlignment="Center" HorizontalAlignment="Center" Visibility="Collapsed">
4: <TextBlock Text="Loading..." FontSize="16" />
5: <ProgressBar x:Name="progress" Width="200" Height="15" Minimum="0" Maximum="100" />
6: </StackPanel>
7: <TextBlock x:Name="txtOutput" Margin="5" Foreground="Black" FontSize="10" />
   8:         <Image x:Name="imageOutput" Stretch="Uniform" Width="Auto" Margin="0" VerticalAlignment="Center"
                   HorizontalAlignment="Center" Visibility="Collapsed"    />
   9:         <z:DZPanel x:Name="zoomOutput" Width="Auto" Margin="0" VerticalAlignment="Center"
 HorizontalAlignment="Center" Visibility="Collapsed"   />
10: </Grid>
11: </ScrollViewer>
6. Implementing the User Interface
6.1 Defining the Remote Data Members
The following code snippet shows the two data members that store the values of the remote addresses. REMOTE_SCRIPT_PATH is the location of the remote script. REMOTE_ABS_PATH is the absolute path where the files are stored. The remote location is hidden from the end user thus allowing for another layer of security.
1: private const string REMOTE_SCRIPT_PATH = "http://www.DOMAIN.com/RemoteFileViewer/xml.php";
2: private const string REMOTE_ABS_PATH = "http://www.DOMAIN.com/sourcecode/files/";
6.2 Implementing the Web Server Connection
The following code snippet shows the implementation of wrapper function for the WebClient API. The function is called twice when retrieving the file list from the server and during the downloading file process. The function accepts the remote address and two callbacks as inputs. WebClient provides methods for sending and receiving data. The WebClient.DownloadStringAsync method is used to download the resource as a string format. DownloadProgressChanged and DownloadStringCompleted are two event handlers that will be use to handle the data transfer and completion. During the transfer, the application displays a progress bar to inform the user of its status. The DownloadStringCompleted validates that the download was successful and stores the results in the DownloadStringCompletedEventArgs member.
1: private void CallWebService(
2: string remoteUrl,
3: DownloadProgressChangedEventHandler changeCallback,
4: DownloadStringCompletedEventHandler completeCallback
5: )
6: {
7: // Load service from the server
8: WebClient client = new WebClient();
9: client.DownloadProgressChanged += changeCallback;
10: client.DownloadStringCompleted += completeCallback;
11: client.DownloadStringAsync(new Uri(remoteUrl, UriKind.Absolute));
12: }
6.3 Populate the TreeView Control
The following code snippet loads the Data.xml file and parses the data into the list of DataCategory object. The data is then bounded to the TreeView control.
1: // Populate categories from local data source
2: XElement root = XElement.Load("Data.xml");
3: Categories = (from c in root.Elements("category")
4: select new DataCategory
5: {
6: Name = (string)c.Attribute("name"),
7: Children = LoadData(c),
8: Folder = (string)c.Attribute("dir"),
9: }).ToList();
10:
11: // Update categories' data
12: listCategories.ItemsSource = Categories;
6.4 Selection Events
The following code snippets show the implementation of the Category and File Selection Events. Both events call the CallWebService function to retrieve data from the server. The File Selection event parses the file based on its file type to provide the appropriate loading.
1: private void listCategories_SelectedItemChanged(object sender, RoutedPropertyChangedEventArgs<object> e)
2: {
3: DataCategory category = (DataCategory)listCategories.SelectedItem;
4:
5: // Validate category (some categories don't have files)
6: if (category == null || category.Folder == "")
7: {
8: listFiles.Visibility = Visibility.Collapsed;
9: return;
10: }
11:
12: // Connect to php service to get files in the folder
13: renderControl.ShowProgress(0);
14:
15: CallWebService(
16: String.Format("{0}?dir={1}", REMOTE_SCRIPT_PATH, category.Folder),
17: DirDownloadProgressChanged,
18: DirDataComplete
19: );
20: }
21:
22: private void listFiles_SelectionChanged(object sender, SelectionChangedEventArgs e)
23: {
24: DataFile file = (DataFile)listFiles.SelectedItem;
25:
26: // Load selected file
27: if (file == null || file.File == "")
28: return;
29:
30: // Get file path
31: string folder = ((DataCategory)listCategories.SelectedItem).Folder;
32: string path = String.Format("{0}{1}/{2}", REMOTE_ABS_PATH, folder, file.File);
33:
34: if (file.Type == "text")
35: LoadFile(path);
36: else if (file.Type == "deepzoom")
37: renderControl.RenderDeepZoom(file, new Uri(path, UriKind.Absolute));
38: else if (file.Type == "image")
39: renderControl.RenderImage(file, new Uri(path, UriKind.Absolute));
40: }
7. Icing on the Cake: Syntax Highlighter
Syntax highlighting provides for a visual addition when viewing source code. I decided to add a basic implementation of Syntax Highlighting to the Remote File Viewer to make the source code stand out. The current version supports string and comment syntax highlighting.
The TextBlock object can hold a collection of Run objects, each with their own style properties. The ApplyHighlighting function accepts the string input from the file and parses the file based on lines. The function performs string checks to find particular tokens, such as comment tokens and string quotations, and render them in separate Run objects. Additional tokens can be supported by comparing to a keyword hash or applying regular expressions.
1: #region Syntax Highlighting
2: //================================================
3: private string AddOutput(string output)
4: {
5: if (output != "")
6: {
7: AddRun(output, Colors.Black);
8: output = "";
9: }
10:
11: return output;
12: }
13:
14: //================================================
15: private void AddRun(string txt, Color color)
16: {
17: Run run = new Run();
18: run.Text = txt;
19: run.Foreground = new SolidColorBrush(color);
20: txtOutput.Inlines.Add(run);
21: }
22:
23: //================================================
24: private void ApplyHighlighting(string txt)
25: {
26: string output = "";
27: bool commentMode = false;
28:
29: // Clean line spacing
30: txt = txt.Replace("\t", " ");
31: txt = txt.Replace(" ", " ");
32:
33: // Clear UI Elements
34: txtOutput.Inlines.Clear();
35: txtOutput.Text = "";
36:
37: // Parse file contents into lines
38: List<string> lines = txt.Split('\n').ToList();
39:
40: foreach (string line in lines)
41: {
42: // Blank line (append to current output)
43: if (line.Trim() == "")
44: {
45: output = String.Format("{0}\n", output);
46: continue;
47: }
48:
49: // Check for comments if we are not in a comment
50: if (!commentMode)
51: {
52: // Visual Studio Region coloring
53: if (line.Contains("#region") || line.Contains("#endregion"))
54: {
55: int index = line.IndexOf("#");
56:
57: // Add words before the comment
58: output = String.Format("{0}{1}", output, line.Substring(0, index));
59: output = AddOutput(output);
60:
61: // Add the comment
62: AddRun(String.Format("{0}\n", line.Substring(index)), Colors.Blue);
63: continue;
64: }
65:
66: // Single line comments (// and # symbols)
  67:             if ((line.Contains("//") && !line.Contains("http://")) || (line.Contains("#")
                       && !line.Contains("\"#") && !line.Contains("#\"")))
68: {
69: int index = 0;
70:
71: if (line.Contains("//"))
72: index = line.IndexOf("//");
73: else
74: index = line.IndexOf("#");
75:
76: // Add words before the comment
77: output = String.Format("{0}{1}", output, line.Substring(0, index));
78: output = AddOutput(output);
79:
80: // Add the comment
81: AddRun(String.Format("{0}\n", line.Substring(index)), Colors.Green);
82: continue;
83: }
84:
85: // Apply string highlighting
86: if (line.Contains("\""))
87: {
88: output = ApplyStringHighlighting(output, line);
89: continue;
90: }
91: }
92:
93: // Comments Highlighting
94: if (line.Contains("/*"))
95: {
96: if (line.Contains("*/"))
97: {
98: try
99: {
100: int index = line.IndexOf("/*");
101:
102: if (index > 0)
103: output = String.Format("{0}{1}", output, line.Substring(0, index));
104: else
105: index = 0;
106:
107: // Add words before the comment
108: output = AddOutput(output);
109:
110: // Add the comment
111: int commentIndex = line.IndexOf("*/");
112: AddRun(line.Substring(index, commentIndex + 2 - index), Colors.Green);
113:
114: // Add the words after the comment
115: output = AddOutput(String.Format("{0}\n", line.Substring(commentIndex + 2)));
116: }
117: catch { }
118:
119: continue;
120: }
121: else
122: {
123: // Append to the output data (not the UI)
124: output = AddOutput(output);
125: commentMode = true;
126: }
127: }
128:
129: // Append string
130: output = String.Format("{0}{1}\n", output, line);
131:
132: // Close comments (if applicable)
133: if (line.Contains("*/") && commentMode)
134: {
135: AddRun(output, Colors.Green);
136: output = "";
137: commentMode = false;
138: }
139: }
140:
141: // Add remainder output
142: output = AddOutput(output);
143:
144: // Update scroll viewer to its top position
145: scrollViewer.ScrollToVerticalOffset(0);
146: }
147:
148: //================================================
149: private string ApplyStringHighlighting(string output, string line)
150: {
151: string curLine = line;
152: bool openString = false;
153: int index = 0;
154:
155: output = AddOutput(output);
156:
157: while (curLine.Length > 1 && curLine.Substring(1).IndexOf('\"') != -1)
158: {
159: index = curLine.IndexOf('\"');
160:
161: if (openString)
162: {
163: AddRun(String.Format("\"{0}", curLine.Substring(0, index + 1)), Colors.Red);
164: openString = false;
165: }
166: else
167: {
168: output = AddOutput(curLine.Substring(0, index));
169: openString = true;
170: }
171:
172: curLine = curLine.Substring(index + 1);
173: }
174:
175: return AddOutput(String.Format("{0}\n", curLine));
176: }
177: #endregion Syntax Highlighting
8. Conclusion
Silverlight provides a wide variety of features to develop rich interactive applications. The WebClient class extends the application with web server functionality by downloading data from the remote web address.
In this article, I demonstrated how the Remote File Viewer application interacts with the remote script using the WebClient class. The basic framework of the Remote File Viewer will allow you to show files to your end users. Other file formats, such as video and audio, can be easily implemented by extending the remote script and the Render Control. The Syntax Highlighting feature is a fun addition that can be further enhanced to handle a variety of scenarios.
Hopefully this article has helped start you along the path of using Silverlight and the WebClient class to create interactive data-driven web applications.