Download source
1. Introduction
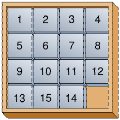
In this article I will present you a game which I created on Silverlight. It is a very small and simple but extremely popular game – the n-puzzle game. The n-puzzle is known in various versions, including the 8 puzzle, the 15 puzzle, and with various names. It is a sliding puzzle that consists of a frame of numbered square tiles in random order with one tile missing. If the size is 3x3, the puzzle is called the 8-puzzle or 9-puzzle, and if 4x4, the puzzle is called 15-puzzle or 16-puzzle. The object of the puzzle is to place the tiles in order (shown on the next figure) by making sliding moves that use the empty space.

If you are interested in more details about the history of the puzzle game, you can use the next link. But now let’s roll up our sleeves and dive into the world of Silverlight. Here is the live demo that you can also find on a separate page.
2. Implementing the puzzle logic
The first goal is to build the game engine, where the whole logic is concentrated. The puzzle consists of some number of tiles. Each tile is presented with a different object of type PuzzlePiece. The class diagram is shown on the next picture.
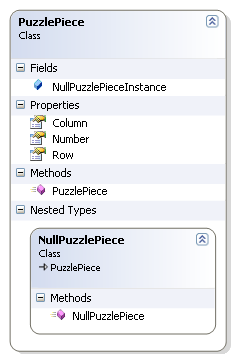
Each piece knows about its current position in the puzzle (through the fields Row and Column). Also each piece knows the place where it must be in the solved puzzle (this is the field Number). You can see that the PuzzlePiece class contains a nested type – NullPuzzlePiece. The NullPuzzlePiece class inherits from the PuzzlePiece. This is a very interesting object-oriented pattern – it is known as a NullObject, and I think a few words must be said about it.
Let’s consider the following example. If we have a 4x4 puzzle, then we have 15 tiles and one empty tile in the puzzle board. We ask the model for a puzzle piece with specific location (row and column). The puzzle model will return null if no object exists (it is the empty tile). Otherwise it will return the requested instance of the PuzzlePiece. We’ve all written code like this before:
PuzzlePiece pp = PuzzleModel.GetPuzzlePiece( row, column );
If( pp != null && pp.Number == 1 )
// do something with the piece
The idiom is common because, in C-based language, the first expression of the ‘&&’ is evaluated first, and the second is evaluated only if the first is true. Most of us have also been burned by forgetting to test for null. We can alleviate the tendency toward error by throwing an exception instead of returning null. However, try/catch blocks can be even uglier than checking for null. We can address these issues by using the Null Object pattern. This pattern often eliminates the need to check for null, and it can help to simplify the code.
The PuzzlePiece class has a static variable NullPuzzlePiece, which holds the sole instance of the nested implementation. Making the NullPuzzlePiece a private nested class is a way to make sure that there is only a single instance of it. No one else can create other instance of the NullPuzzlePiece. This is a good thing, because we want to be able to say something like this:
If( puzzlePiece == PuzzlePiece.NullPuzzlePiece)
// do something
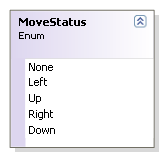
I think this is enough for the NullObject pattern. Let’s continue with our puzzle logic.According to the rules each piece can be moved horizontally or vertically. Then we need an enumeration for the available move statuses.
Next is the heart of our application – it is the PuzzleModel class. The class diagram is shown on the next picture.
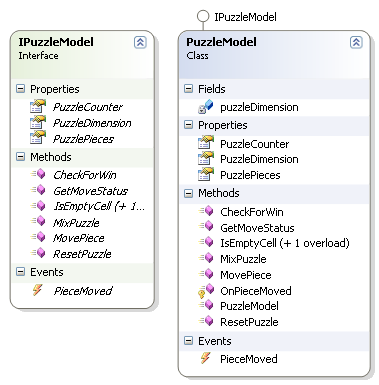
It implements the IPuzzleModel interface and provides the following methods:
- CheckForWin – this method is called after each move of the user. The algorithm for check is extremely simple. It is composed of two parts. First, if the empty piece is not in the lower right part of the board, then the puzzle is not solved. Second, if the numbers of the puzzle pieces are in row, then the puzzle is solved.
- GetMoveStatus - it returns information about the available move for the target piece.
- MixPuzzle – that method is invoked when the puzzle must be mixed. During the initial development of the application I faced the following problem. It is known that half of the starting positions for the n-puzzle are impossible to resolve, no matter how many moves are made. For example see the next picture.
So the target was an algorithm that mixes the puzzle and ensures that it can still be solved. The algorithm which I use in my application is based only on legal moves emulation. In other words, I just simulate fairly number of user moves in order to mix the puzzle board.
- MovePuzzle – that method simulates piece moving. It just exchanges the positions of the target piece with the empty piece.
- ResetPuzzle – restores the original puzzle board.
- There is a custom event which is raised only when a puzzle piece is moved.
3. Implementing the user interface
Although the UI is not something special there are few tricks that must be mentioned. To represent the puzzle piece I created a separate user control. The next code snippet shows you the XAML code for the puzzle piece.
<Grid x:Name="LayoutRoot" RenderTransformOrigin="0.5,0.5" Background="Transparent"
MouseEnter="ImageRoot_MouseEnter" MouseLeave="ImageRoot_MouseLeave">
<Grid.RenderTransform>
<TransformGroup>
<TranslateTransform x:Name="Translation" X="0" Y="0" />
</TransformGroup>
</Grid.RenderTransform>
<!-- Show the puzzle image -->
<Image x:Name="PuzzlePieceImage" Stretch="Fill"/>
<!-- Show help number in the top left button of the control -->
<TextBlock x:Name="tbHelp" Margin="2,0,0,0" Foreground="Transparent" TextAlignment="Left"/>
<!-- Simulate image border. Since there is no thickness animation in silverlight i must use rectangle -->
<Rectangle x:Name="PuzzlePieceBorder" Fill="Transparent" StrokeThickness="0"
MouseLeftButtonDown="PuzzlePieceImage_MouseLeftButtonDown">
<Rectangle.Stroke>
<LinearGradientBrush EndPoint="0.787,0.09" StartPoint="0.213,0.91">
<GradientStop Color="#FF000000"/>
<GradientStop Color="#FFFFFFFF" Offset="1"/>
<GradientStop Color="#FF3C3C3C" Offset="0.246"/>
<GradientStop Color="#FF868686" Offset="0.52700001001358032"/>
<GradientStop Color="#FFC1C1C1" Offset="0.75900000333786011"/>
</LinearGradientBrush>
</Rectangle.Stroke>
</Rectangle>
</Grid>
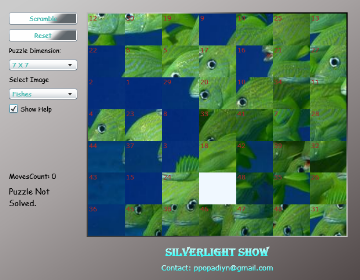
The main window of the game is shown on the next picture.

The user is allowed to set the puzzle dimension – 2x2, 3x3, 4x4, etc. The user can choose the puzzle picture.
The most difficult part during the puzzle implementation was how to show a specific part of the image on the PuzzlePiece control. If the puzzle dimension is 3x3, then the puzzle image must be split on 8 pieces (the last one must be removed – this is the empty piece). If we use WPF, then this is very easy task – we will use the VisualBrush object and will set its ViewBox property. But we are using Silverlight, that’s why we should work-around the limitations. In order to split the puzzle image in different pieces I will create a web service. Inside the web service I will use the Graphics class to split the image:
[OperationContract]
public byte[][] GetSplittedImage( byte[] source, int rows, int columns )
{
Image sourceImage = Image.FromStream( new MemoryStream( source ) );
int width = sourceImage.Width / rows;
int height = sourceImage.Height / columns;
List<byte[]> splittedImages = new List<byte[]>( ( rows * columns ) - 1 );
for ( int i = 0; i < rows; i++ )
{
for ( int j = 0; j < columns; j++ )
{
if ( i == rows - 1 && j == columns - 1 )
continue;
Image partImage = new Bitmap( width, height );
using ( Graphics g = Graphics.FromImage( partImage ) )
{
g.Clear( Color.Red );
                g.DrawImage( sourceImage, new Rectangle( 0, 0, partImage.Width, partImage.Height ),
                             new Rectangle( j * width, i * height, width, height ), GraphicsUnit.Pixel );
MemoryStream ms = new MemoryStream();
partImage.Save( ms, ImageFormat.Jpeg );
splittedImages.Add( ms.GetBuffer() );
}
}
}
return splittedImages.ToArray();
}
Next we want to create an animation that slides lightly a puzzle piece from one slot to another. Since the puzzle pieces are not created declaratively but dynamically (in the procedural code), the sliding animation also must be created and started in the C# code. It can be seen on the next figure:
// Create new storyboard for animating the puzzle piece
Storyboard slideStoryboard = new Storyboard();
DoubleAnimation slideAnimation = new DoubleAnimation();
Storyboard.SetTarget( slideAnimation, piece.Translation );
if ( isMoveHorizontal )
Storyboard.SetTargetProperty( slideAnimation, new PropertyPath( "X" ) );
else
Storyboard.SetTargetProperty( slideAnimation, new PropertyPath( "Y" ) );
slideAnimation.To = distance;
slideAnimation.Duration = TimeSpan.FromSeconds( 0.35 );
slideStoryboard.Children.Add( slideAnimation );
slideStoryboard.Completed += ( s, a ) =>
{
piece.Translation.X = 0;
piece.Translation.Y = 0;
piece.SetValue( Grid.RowProperty, newPositionRow );
piece.SetValue( Grid.ColumnProperty, newPositionColumn );
};
slideStoryboard.Begin();
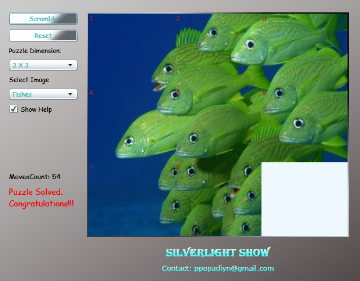
4. Testing the application
We are ready to start and solve the puzzle.
You can choose different puzzle dimensions and different images. Thus you can control the game difficulty. For those which are in difficult position and cannot solve the puzzle there is help. When you check the Show Help check box, a number will be shown on each piece (like on the original idea of the puzzle).
You can find the live demo on this page also.
5. Conclusion
In this article I showed you how you can create a funny game with the help of some design-patterns and simple Silverlight feature. Although I was forced to seek work-arounds, due to some Silverlight limitations, I think the power of Silverlight is obvious. If you have any further idea for improvements, please contact me. Good luck with the puzzle. :)
6. References
http://en.wikipedia.org/wiki/Fifteen_puzzle
http://silverlight.net/quickstarts/animations.aspx