In the previous article, we’ve covered background tasks in Windows 8. The background tasks we’ve covered are what I refer to as regular background tasks. With that I mean, they only run when a specific system-event is triggering (indeed a so-called trigger). While they are perfectly useful in some scenarios, some other scenarios require that we have more control over the execution of the background task as well as get more resources assigned for the task. For these cases, creating a lock screen application might be a solution. Lock screen applications are the focus of this article.
The reason for lock screen apps
As mentioned in the introduction, the background tasks we’ve covered in the previous can cover some scenarios but certainly not all. Today’s world of computing requires that we have a multitude of applications open that can receive updates whenever they happen, wherever they happen. Think of a typical Facebook client application that needs to inform the user about a status change on the social media network. But think also of applications such as Skype or any other IM or VOIP application for that matter. With the regular background tasks we have in Windows 8, it’s not possible to accept an incoming phone call or receive status updates.
Traditionally, these types of “problems” have been solved by having the application run in the background or perhaps have a long-running process that listens for incoming connections and have an always-open connection as well. But we’ve seen that running an application in the background isn’t possible (only one application can be the foreground application). And we’ve also seen that Microsoft is optimizing Windows for less power usage and therefore longer battery life. There’s however a contradiction here: on one hand, we want good battery life, on the other we want to have open connections and always running processes… You can’t have it all, can you?!
But no fear, we can still build these kinds of applications using Windows 8 and we can do so using the lock screen API to build lock screen applications. Let’s explore what a lock screen application is and what the API is all about.
Lock screen applications and the API
Simply put, a lock screen application is an application that can run a process in the background, even when the device is on the lock screen. By declaring and registering an application as a lock screen application, the application gets access to a specific set of triggers, only available for lock screen applications.
Let’s dive a bit deeper in that here. So a lock screen application is nothing more than an application that on one hand registers itself to run a background task, even when the system is on the lock screen. And by doing so, it gets access to a number of triggers – 3 to be exact – that are only available when the application is a lock screen application. So it’s indeed a two-way street: you have to use these triggers and you can basically only use these triggers when your application is a lock screen app.
The lock screen API defines 3 triggers:
- The Push Notication trigger
- Network triggers
- Time trigger
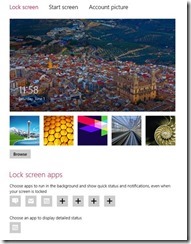
The first step in becoming a lock screen application is asking the user to give your application permission to be on the lock screen. A specific API call exists for this, BackgroundExecutionManager.RequestAccessAsync. When the user allows the application to go on the lock screen, it can use the triggers to run code. The important thing to note here is: the user remains in control. If the user doesn’t want the application to go on the lock screen, he’ll be able to cancel it. Alternatively, the user can manage the lock screen through the control panel. On the screenshot below, you can see the interface to manage the lock screen.

On the screenshot below, we can see that the user can add up to 7 apps to show updates on the lock screen. One application can also be selected to show tile updates.
Not every application should try to get onto the lock screen. In fact, most applications don’t have to. Also, even if your application would like to go on the lock screen, it should still continue to function even if the user denies it lock screen access.
Once the application is on the lock screen, as mentioned, it can use the newly available triggers to run code. So it can for example show a tile update, display a toast… Even if the application is on the lock screen, it can still show a toast message. This is particularly important for Skype-like applications: these apps can then show a toast message on the lock screen. When the user taps it, he’s requested to log in and after log in, the application that had shown the toast message, will be activated.
One direct consequence of being allowed on the lock screen is the relaxed constraints that are in effect on the application. In the previous article, we’ve touched on the constraints already, but some more explanation is in place!
Constraints and lock screen applications
Every background task is limited in CPU and network usage. However, there’s a difference between what “regular” background tasks can do and what lock screen apps can. Lock screen apps have more relaxed constrains being applied on them. The table below gives a small overview.
|
|
CPU resource quota
|
Refresh period
|
|
Lock screen app
|
2 CPU seconds
|
15 minutes
|
|
Non-lock screen app
|
1 CPU second
|
2 hours
|
As can be seen, the amount of execution time a background task gets is pretty low. Although it’s higher for lock screen apps, it’s still pretty low. One thing to note here is that these are CPU seconds. A CPU second is basically a core running at 100% for 1 second. So if you have a background tasks that uses around 10% CPU for 1 wall-clock second, it has used 0,1 CPU second. If you have more core available, this will have an influence on the available CPU seconds as well (8 cores would give us 8x more time).
Although these constrains are hard, Windows does guarantee resources for critical tasks such as having an open socket to listen for incoming messages.
Creating a lock screen app
Now that we know what lock screen applications are and have seen the constraints, it’s time to build an application that can run on the lock screen. In fact, we are going to split things in 2 parts. First, we are going to prepare an application to it’s lock screen capable. Secondly, we are going to extend the sample using a Push Notification Trigger. The application we are going to use here is a simulated mail application that is notified about new mail messages arriving on the server. A mail application is a typical application that can benefit from being able to update the lock screen, to provide the user with information about newly arrived messages.
We have to follow a couple of steps to make an app lock screen enabled. As mentioned, we are going to start by preparing the app to be lock screen enabled.
Requesting lock screen access
Request to be placed on the lock screen. To do so, we use the BackgroundExecutionManager.RequestAccessAsync(). If the user agrees, the application is placed on the lock screen (if there’s an available spot; if not, the user will first have to remove another app from the lock screen). If the user denies access to the lock screen, the app won’t be able to ask again. In other words, it’s not possible for the application to nag the user, asking him every time the app runs to be placed on the lock screen.
In the following code, we are starting by checking if the user was already presented with the dialog. If so, we shouldn’t be showing it again! After that, we perform the RequestAccessAsync call. The application is permitted lock screen access if the return value of that method is AllowedMayUseActiveRealTimeConnectivity or AllowedWithAlwaysOnRealTimeConnectivity.
1: if (BackgroundExecutionManager.GetAccessStatus() == BackgroundAccessStatus.Unspecified)
2: {
3: BackgroundAccessStatus backgroundAccessStatus = await BackgroundExecutionManager.RequestAccessAsync();
4:
5: if (backgroundAccessStatus == BackgroundAccessStatus.AllowedMayUseActiveRealTimeConnectivity ||
6: backgroundAccessStatus == BackgroundAccessStatus.AllowedWithAlwaysOnRealTimeConnectivity)
7: {
8: //we can send an update to the lock screen from here!
9: CreateBadgeUpdate(count);
10: }
11: }
Some more things have to be prepared though, just writing some code isn’t enough!
Manifest changes
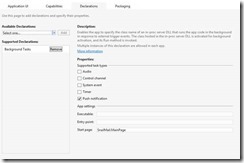
To make the app lock screen capable, we need to make a couple of manifest changes. In the Package.appxmanifest, we need to declare one of the triggers of API specific for lock screen apps. In this case, I’ve just selected Push Notification trigger (at this point, we’re not actively using these yet, but without setting this, the app will never appear on the lock screen).

The application should also declare a wide logo.
Also, a badge logo needs to be specified.
And finally, the Lock Screen notifications must be set to Badge (badge update only) or Badge and Tile Text (making your application capable of also being selected as the app that can provide a tile update on the lock screen).
When we run this application now, the following dialog is shown.

Note that this will only appear the very first time, if the user clicks on the Don’t Allow, this dialog won’t be shown again. If the user wants to later make changes, he needs to go through the Settings charm, as shown below.
Send a badge update
With the app on the lock screen, we can now update the badge. The following code does exactly that. This code can be used from wherever we want in the application to update the badge on the lock screen.
1: private static void CreateBadgeUpdate(int count)
2: {
3: string xml = "<badge value='badgevalue'/>";
4:
5: xml = xml.Replace("badgevalue", count.ToString());
6:
7: XmlDocument xmlDocument = new Windows.Data.Xml.Dom.XmlDocument();
8: xmlDocument.LoadXml(xml);
9:
10: BadgeNotification badge = new BadgeNotification(xmlDocument);
11: BadgeUpdateManager.CreateBadgeUpdaterForApplication().Update(badge);
12: }
But wait, this is not in the background…?
Correct, all this was in the main application code. To update the lock screen from a background process, we need to add a process and use a specific trigger. We’ll do that in the next article of this series!
Summary
In this article, we’ve seen what lock screen applications are and how we can modify an application so it can update the badge on the lock screen. In the next article, we’ll extend the sample so that the updates can be send from a background process.
About the author
Gill Cleeren is Microsoft Regional Director, Silverlight MVP, Pluralsight trainer and Telerik MVP. He lives in Belgium where he works as .NET architect at Ordina. Gill has given many sessions, webcasts and trainings on new as well as existing technologies, such as Silverlight, ASP.NET and WPF at conferences including TechEd, TechDays, DevDays, NDC Oslo, SQL Server Saturday Switserland, Silverlight Roadshow in Sweden, Telerik RoadShow UK… Gill has written 2 books: “Silverlight 4 Data and Services Cookbook” and Silverlight 5 Data and Services Cookbook and is author of many articles for magazines and websites. You can find his blog at www.snowball.be. Twitter: @gillcleeren